Abarth Uconnect 5" to 7" Upgrade with Apple CarPlay
Apple CarPlay (and Android Auto) is a total game changer for in-car connectivity. No longer is the head unit statically locked to the year of the car, but continually upgrades with the progress of the apps on the phone. (Not to mention in general the decline in car tech quality). I hardly ever use my "car stereo" to listen to broadcast AM/FM, but instead use it for GPS and streaming (including from my home SDR while on the road). While there are many after-market options to upgrade your car to have CarPlay connectivity, I wanted to maintain the "stock" look of my 2017 Abarth 595c by upgrading to the newer 2021 head unit with built-in CarPlay. It's actually quite easy and quick, but there are a few gotchas which I detail below. Click on any of the images to enlarge them.
Step 1 - Is this for you?
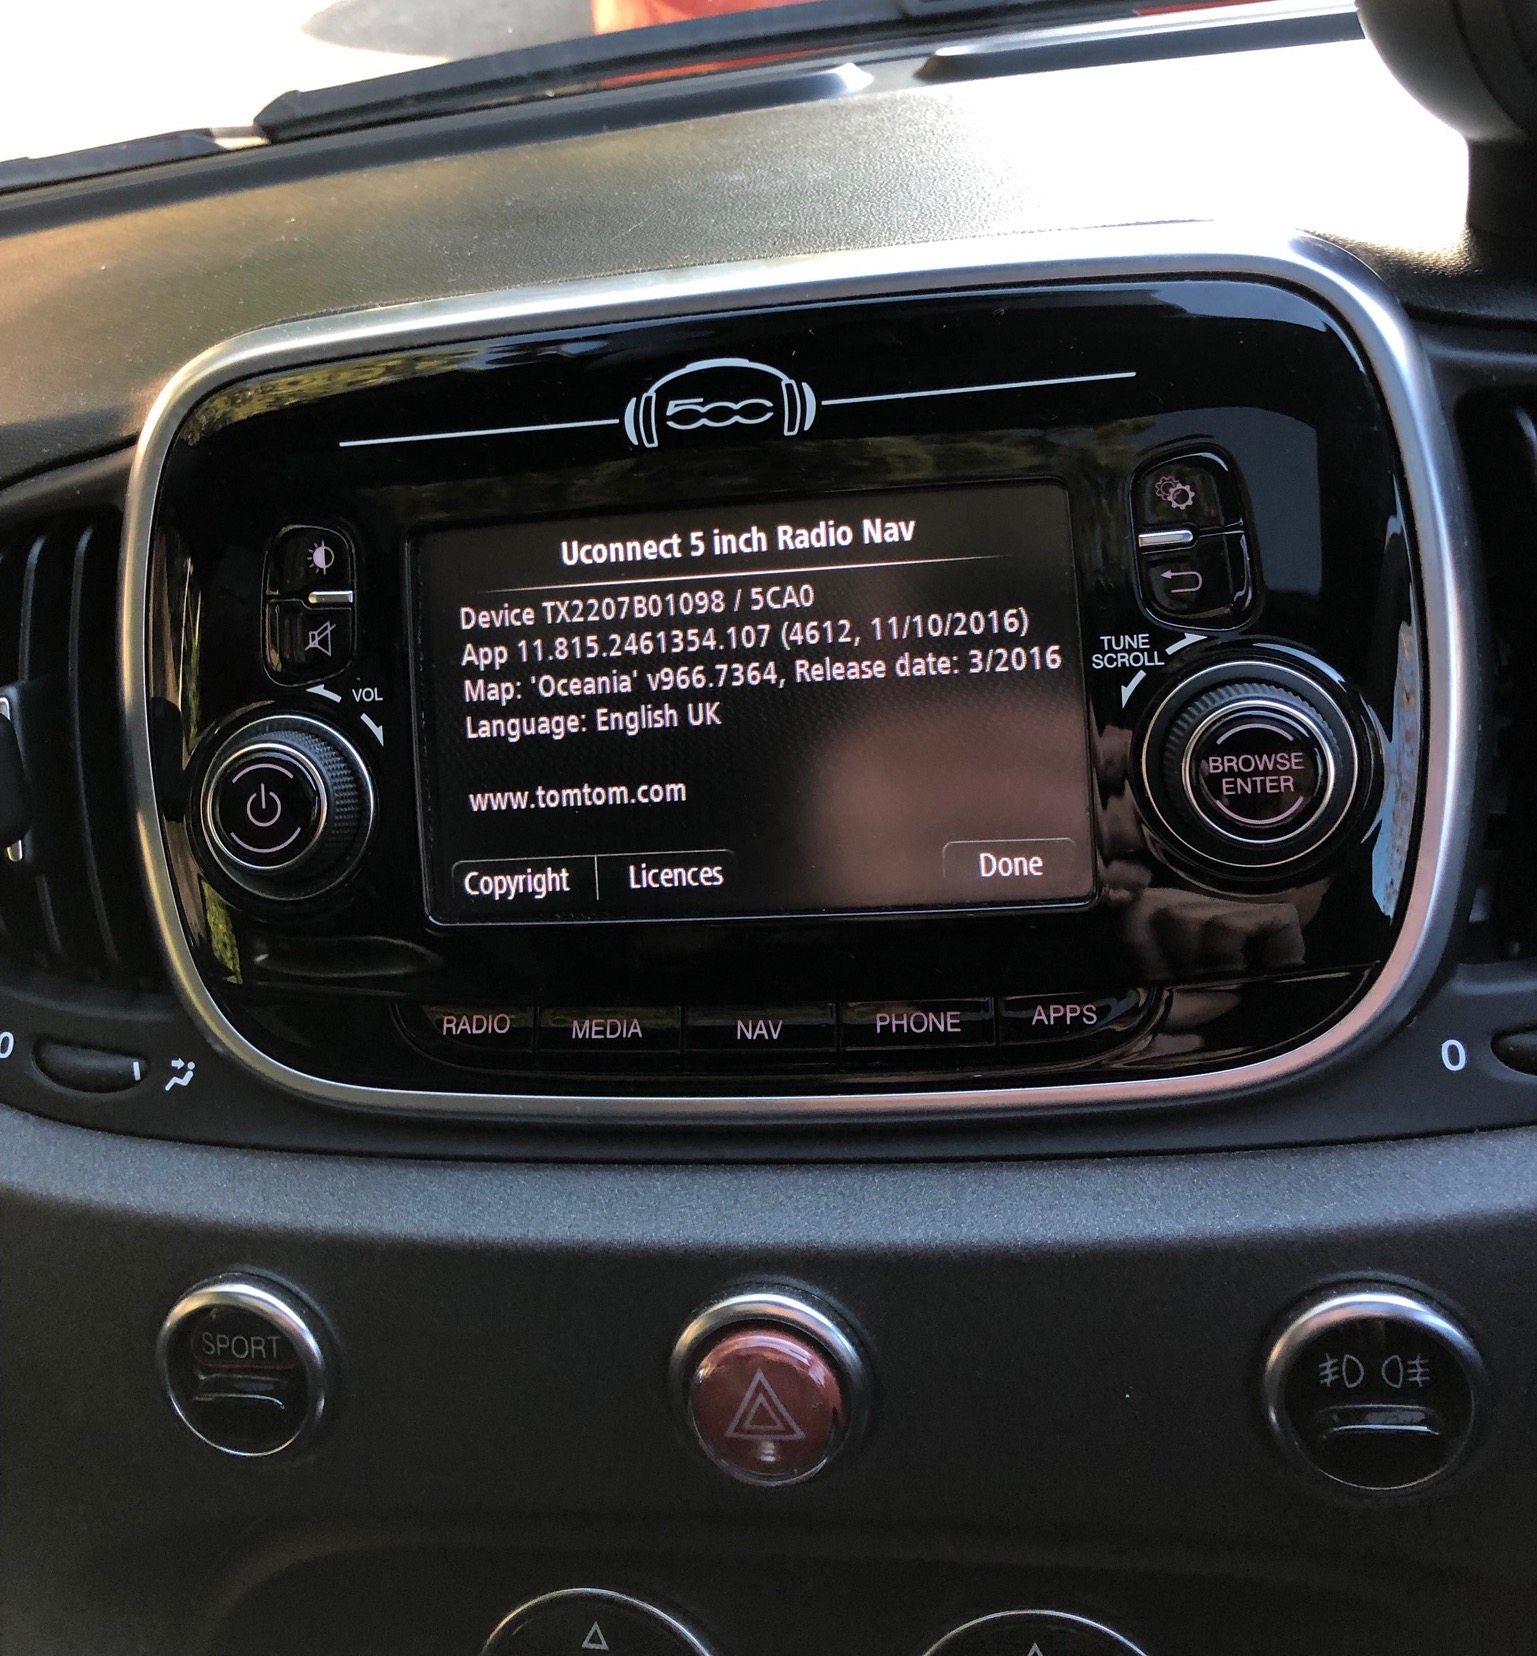
The stock radio that came with my 2017 Abarth 595 was this Uconnect 5" with built in TomTom Navigation. Previous generation Fiat 500s and Abarths had a completely different radio and I don't know if these instructions will apply. The bezel with the silver trim and the vents are part of the housing that the radio is meant to fit inside.
Step 2 - Find a Uconnect 7" with Apple CarPlay
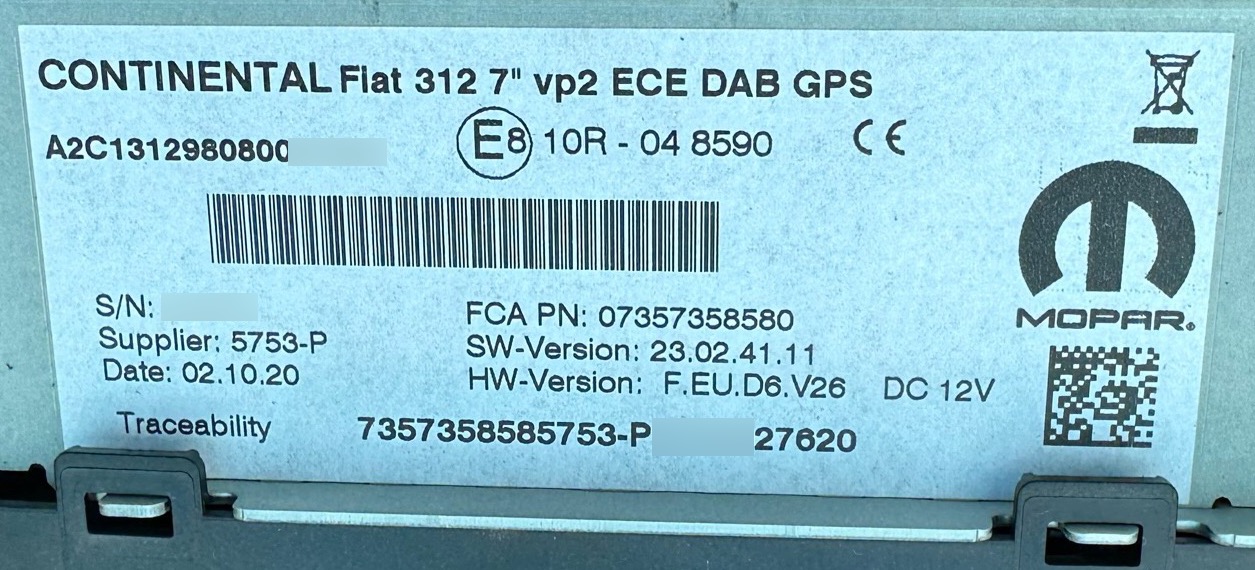
It turns out that not all of the 7" Uconnects have Apple CarPlay functionality. They come in 3 broad versions... with/without CarPlay, with/without Navigation and with/without DAB. If you are buying one from Australia I think they will all have CarPlay, but if sourcing from overseas you need to mind the exact version that you are getting. In particular "w/o CarPlay" on the sticker will definitely mean it's not installed. The part number at the top says GPS, but that doesn't mean it has navigation, it just means that it can display a compass. If you have the version with navigation it will say NAV. With CarPlay, I don't really see the need to have a separate navigation capability within the head unit, but something to keep in mind if that's important to you.
Step 3 - You need to get a bezel and vents
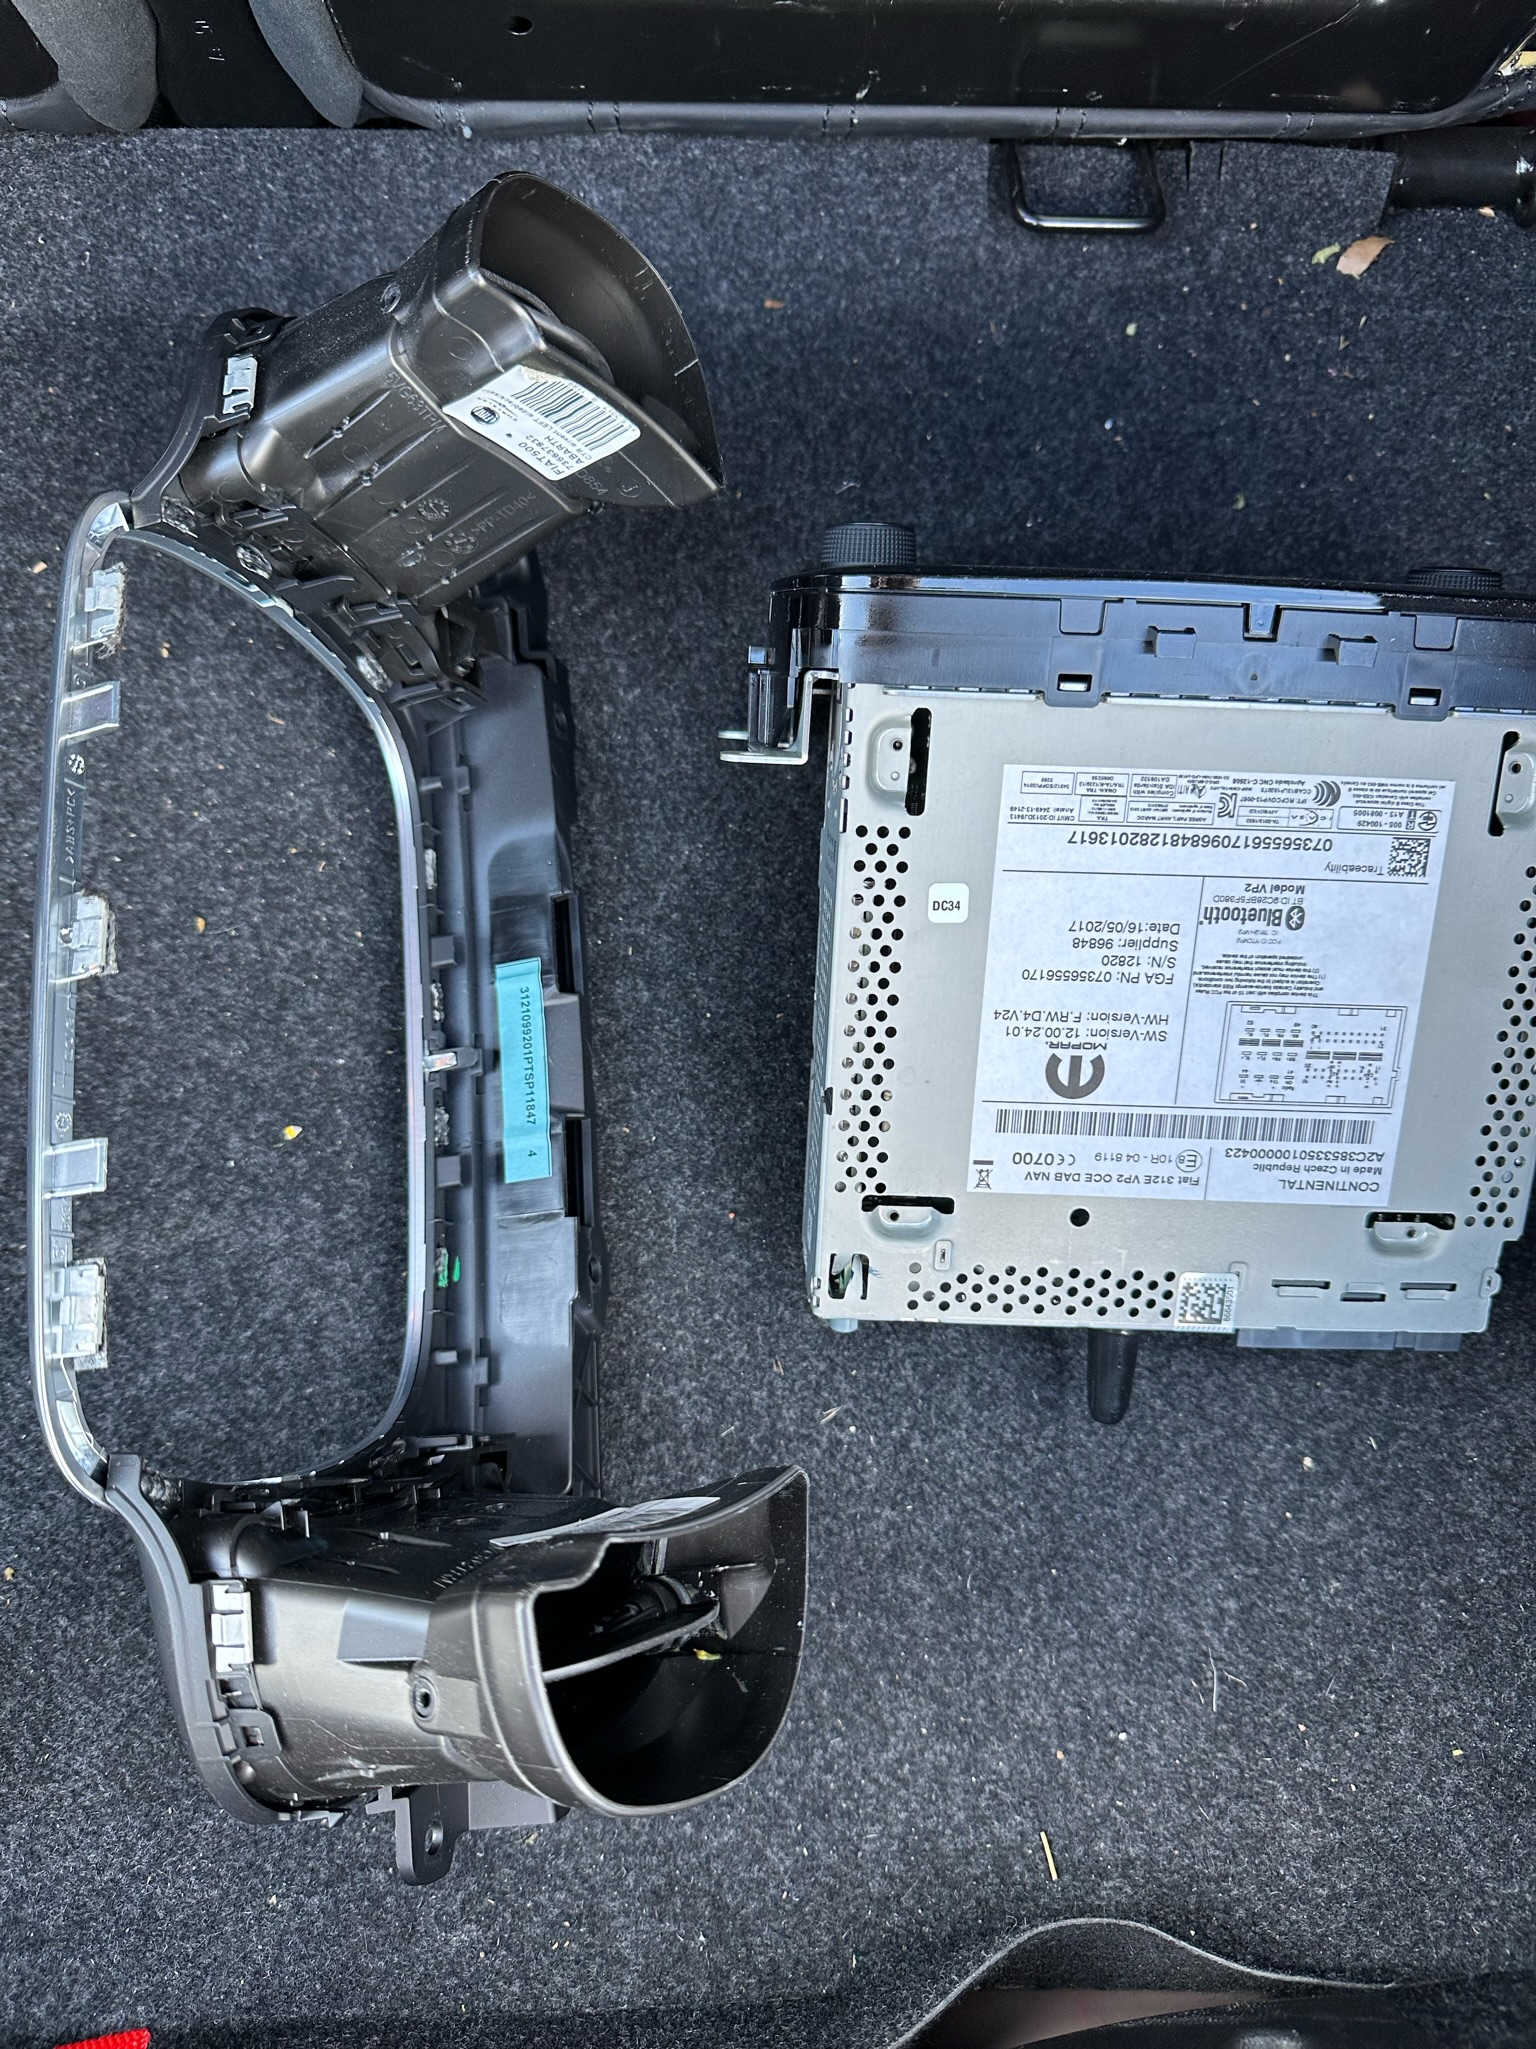
The silver ring around the radio and the vents are part of a housing that differs between the 5" and 7" radios. When you look at them side-by-side they look incredibly similar, you can hardly tell the difference, except the 7" Uconnect won't fit in the 5" housing. This image is my old 5" radio and the 7" compatible housing. You can see it includes the vents on both sides. Ideally if you get a 7" you will also get that part as well. The correct 7" part number is FIAT 500 735637831 ABARTH "CTR airvent RIGHT sideblack/satin" The other side is marked FIAT 500 735637832 ABARTH "CTR airvent LEFT sideblack/satin". The ovoid bezel is part number 735672257 though that wasn't clearly visible, it also had a blue sticker with 3121099201PTSP11847 printed on it. My old 5" one was marked 735735286 (Right) and 735735286 (Left) and 3121419001PTSP13810 20 on the blue sticker.
Step 4 - Time to swap the parts!
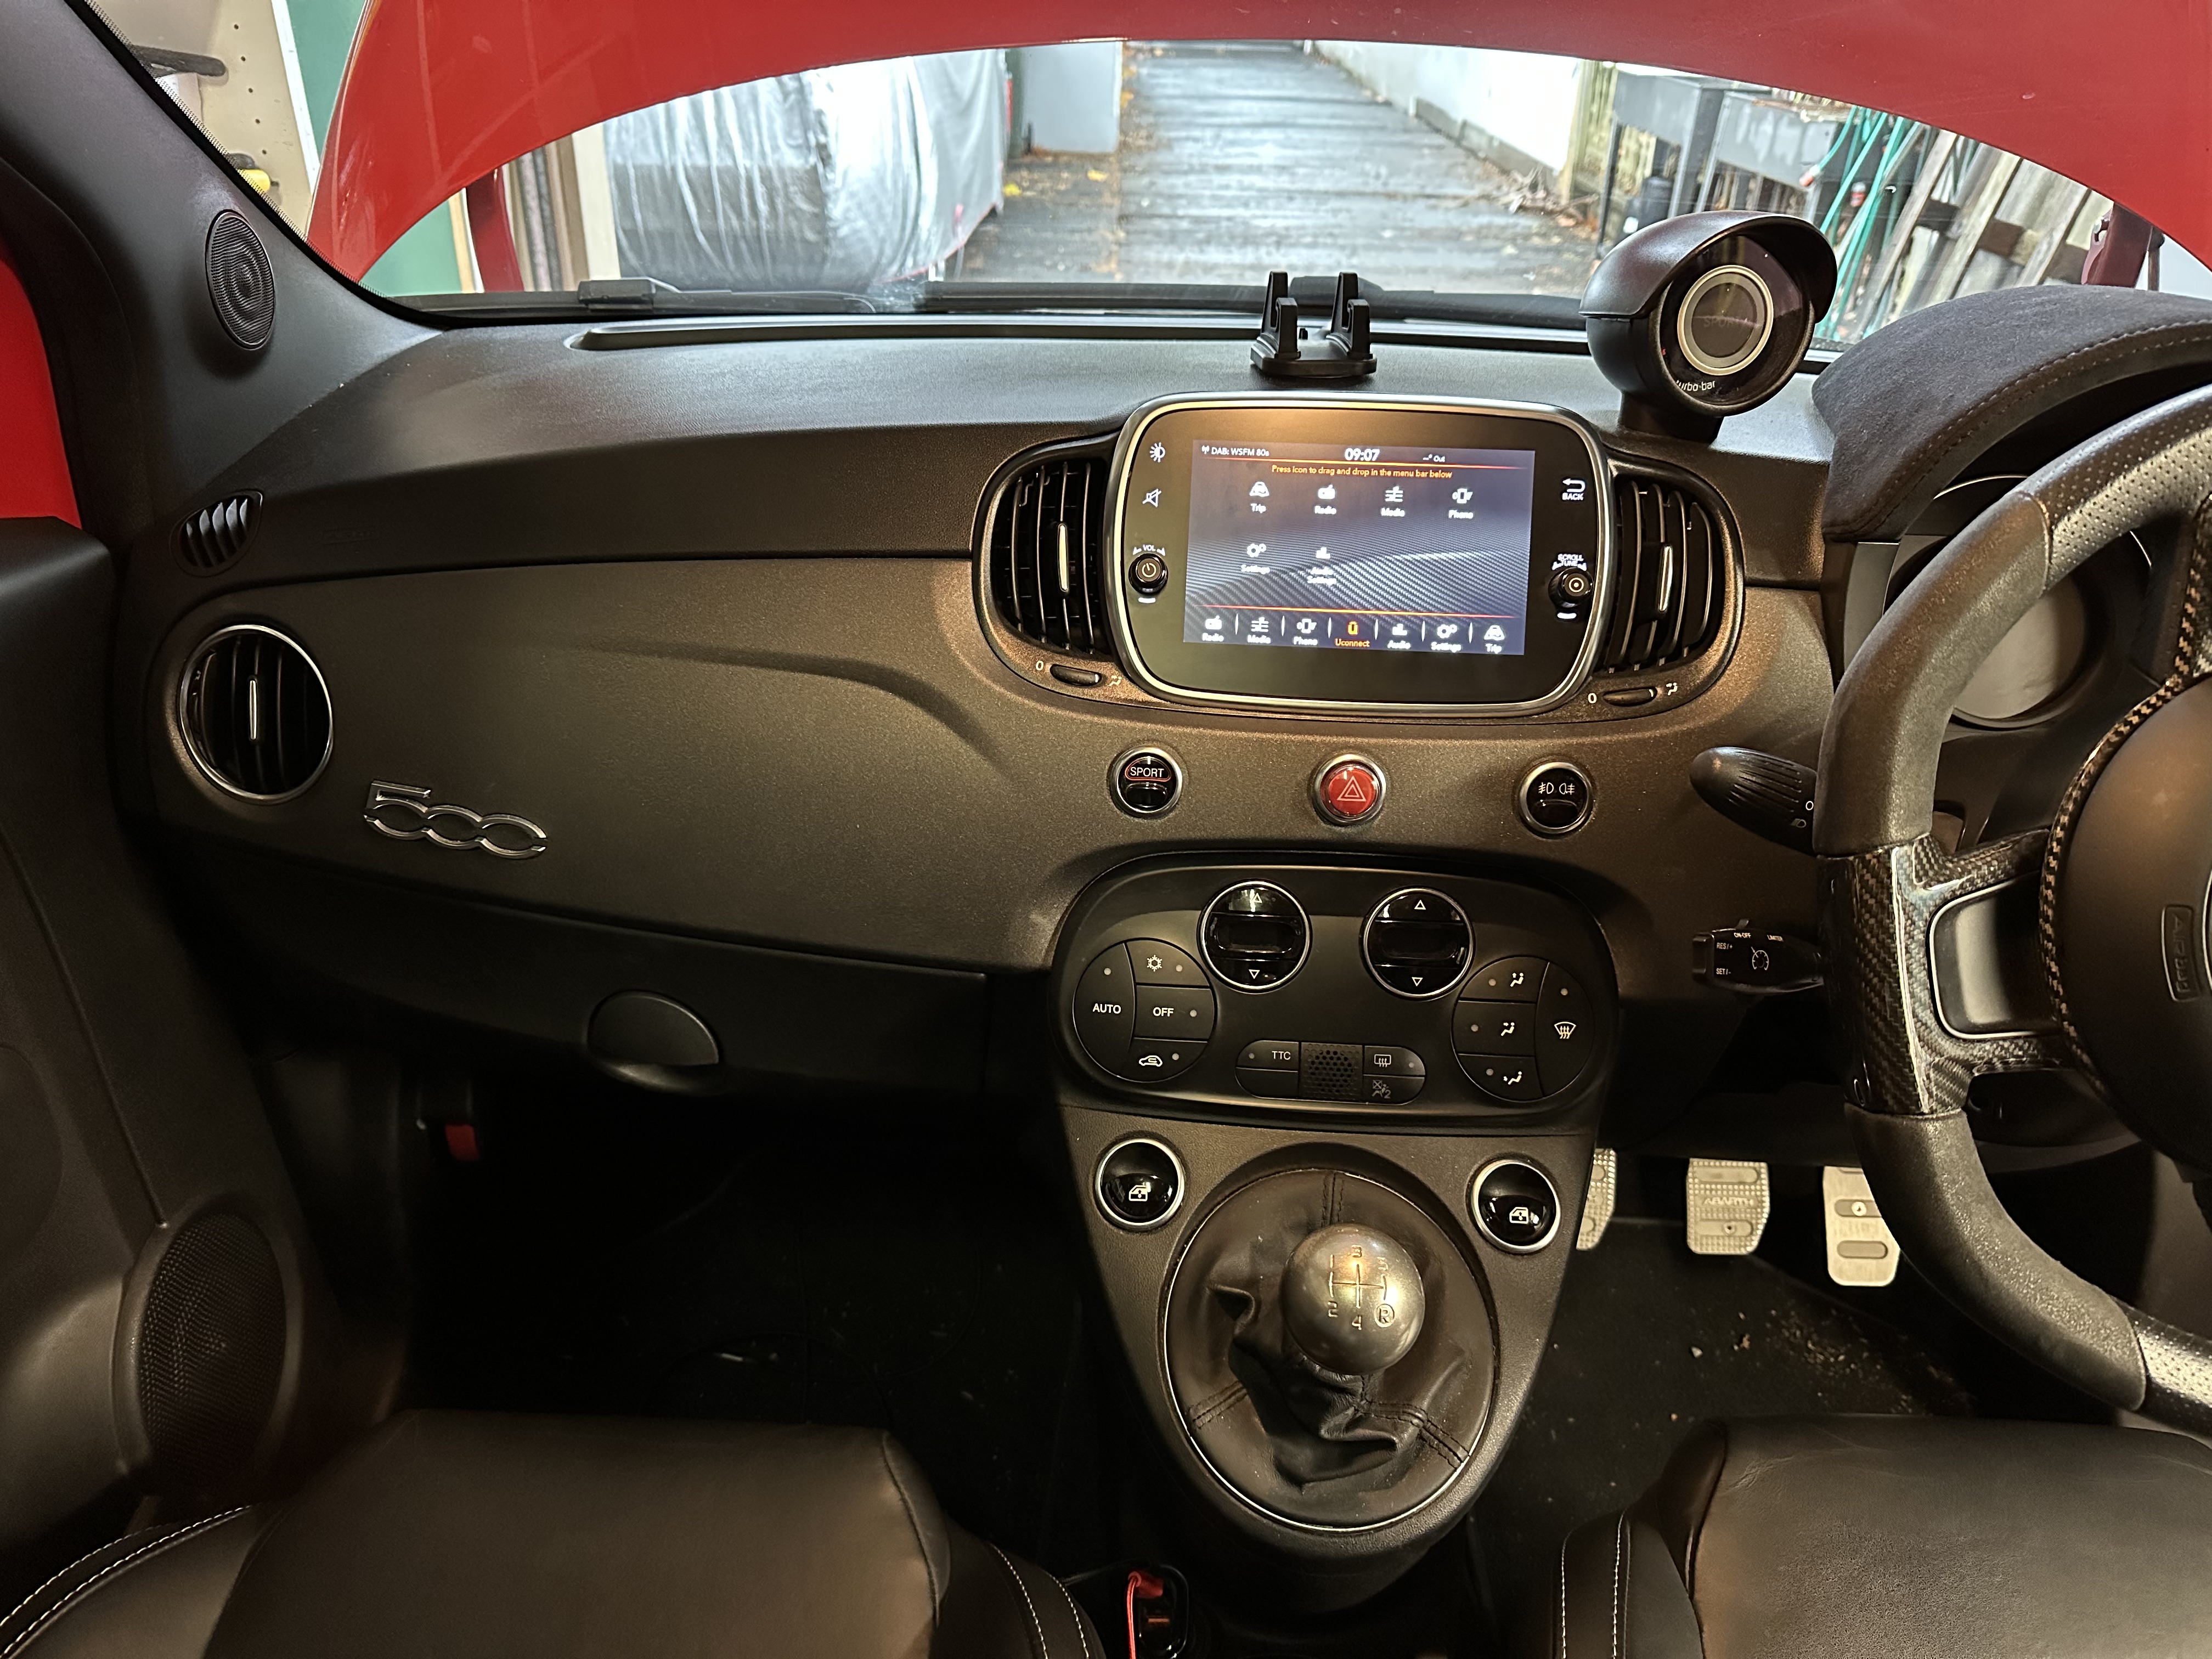
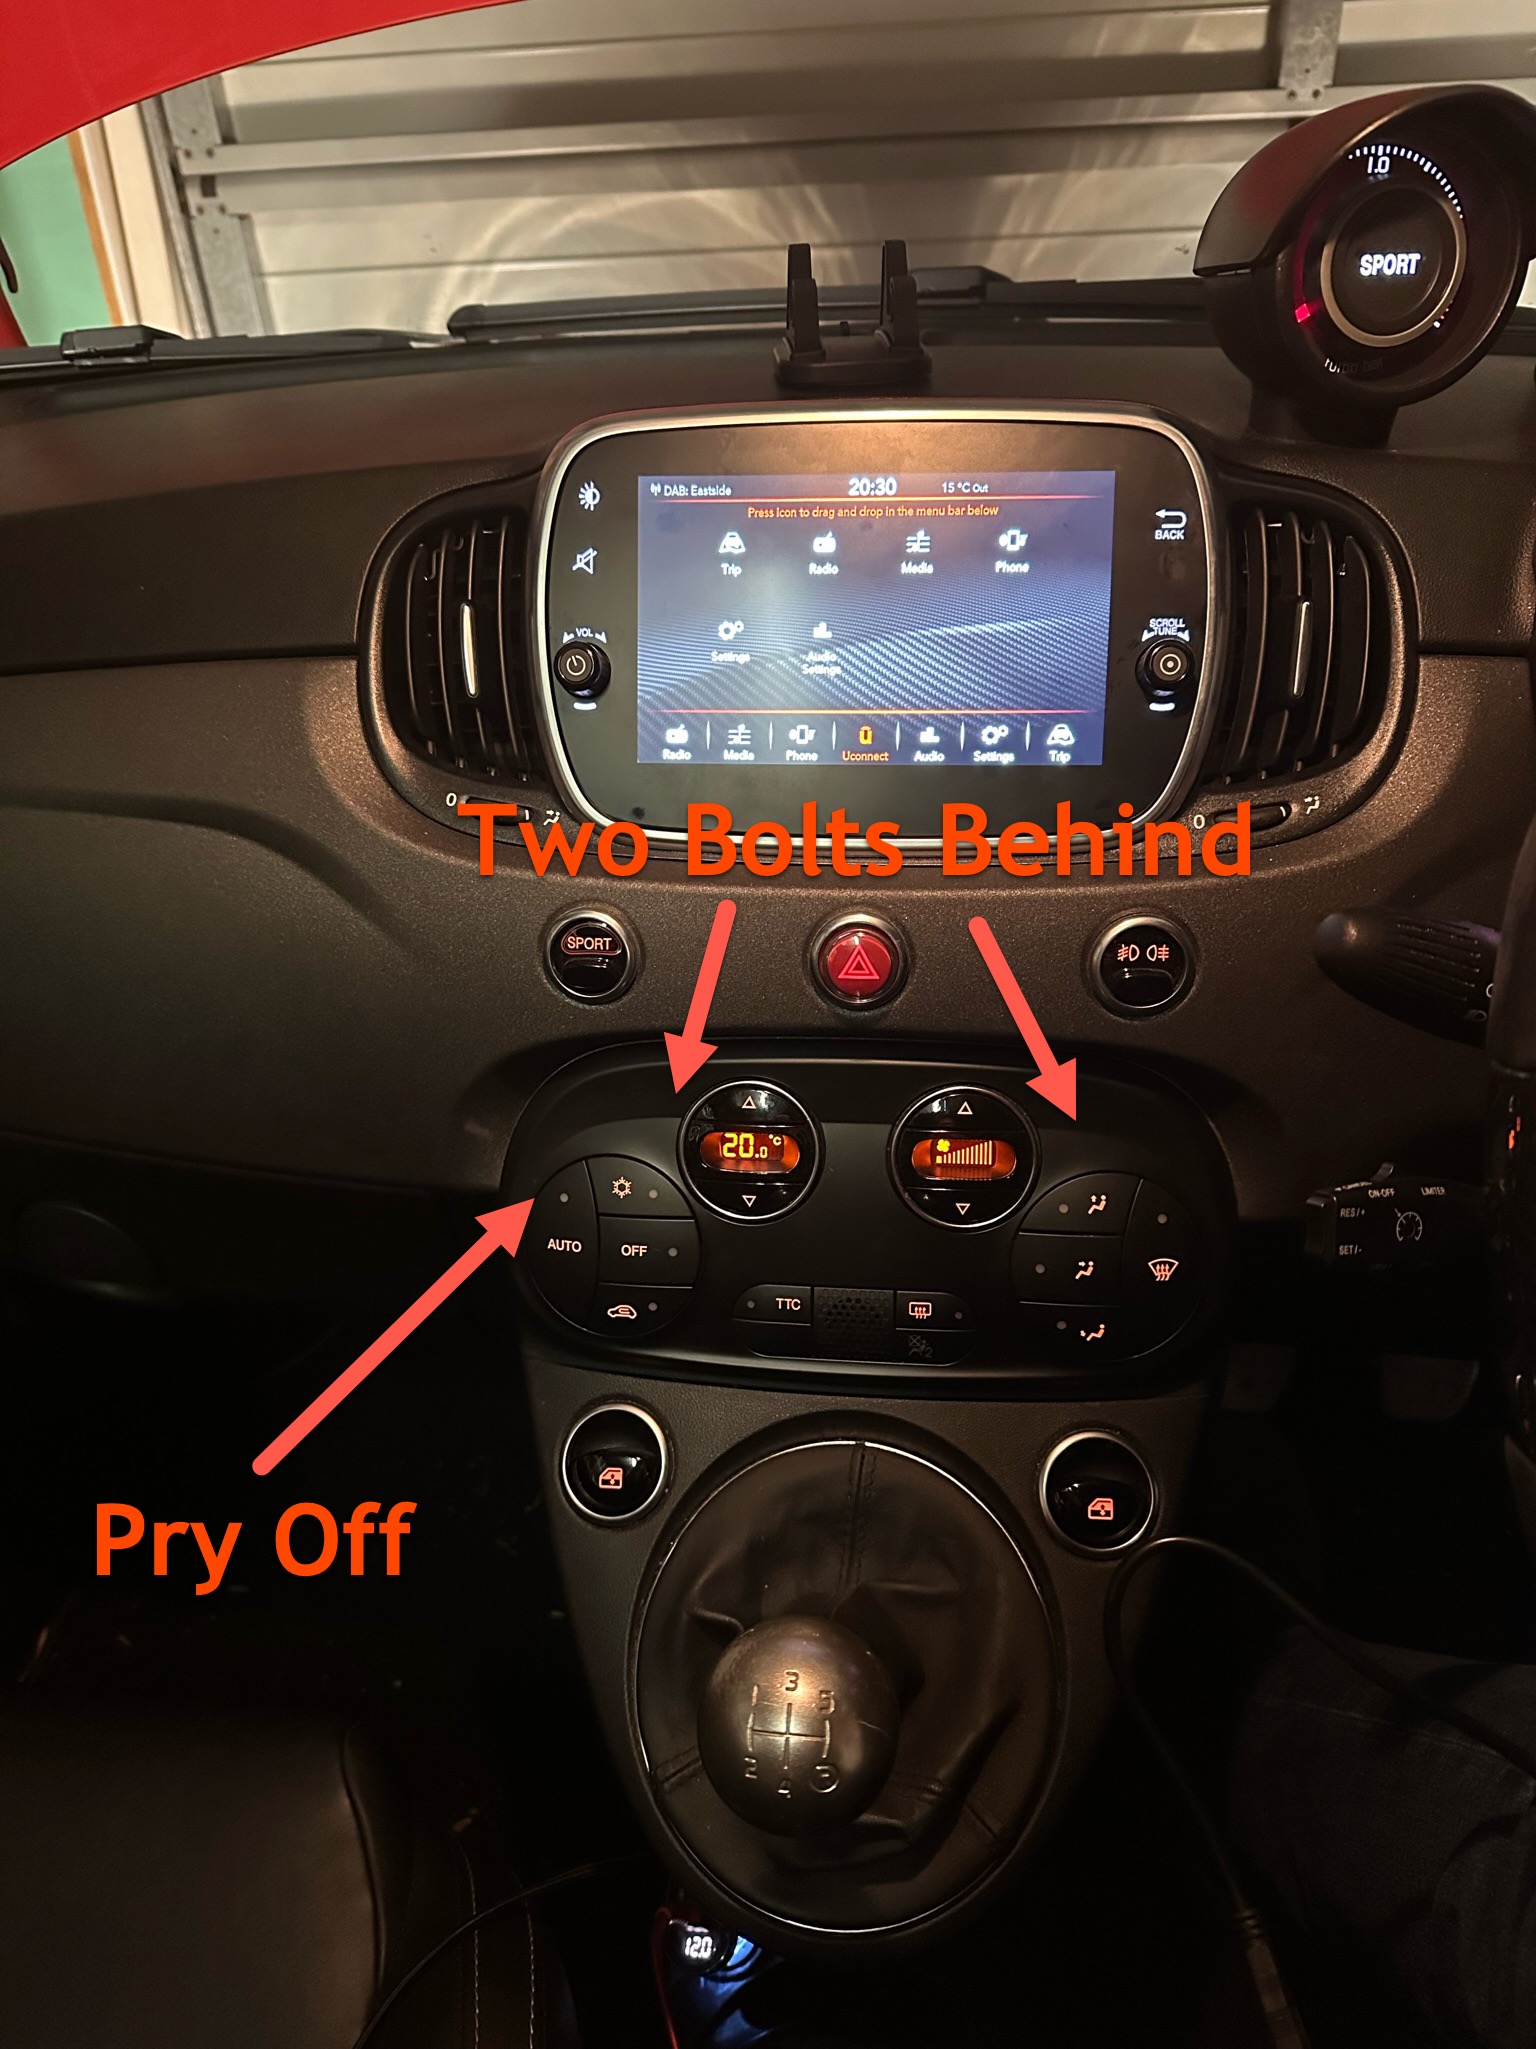
There are lots of great videos on Youtube that show you how to do the physical swap, for example this one is excellent: https://youtu.be/qvEWybAC9qM. All the videos I've found start after the removal of the climate panel, so for the sake of completeness, the photo on the right can be used as a guide. You need to pry off (just with your fingers - or a trim puller tool) the climate control panel. Behind that are two bolts that hold on the dash panel that also needs to be removed. There is a third bolt at the far end of the glovebox near the door. With those three bolts removed (you don't need to remove any others) you can pry off the part of the dash with the hazard light switch. Do it carefully as there is a cable going to that part of the dash. Once that is exposed, it's just a few more bolts to remove the vents and radio per the YouTube video.
Step 5 - Power Up for the first time! - Get the Key Code
In my case all the cables that came off the 5" Uconnect just plugged right into a similar spot in the 7" Uconnect. This might not be the case if, for example, you are going from a setup without NAV to one with NAV, or without DAB to one with DAB. You'll need to get the additional parts to feed the GPS antenna and DAB version of the antenna to the new radio.
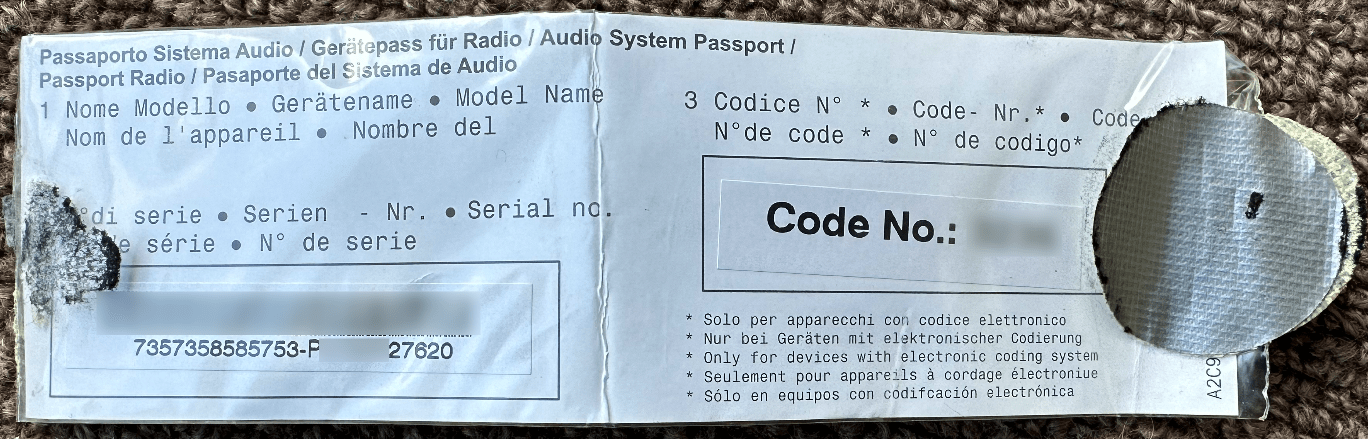
Once the radio powers up for the first time you will be asked to input a code. This is a four-digit code that came with the car and it's on a small piece of paper labeled "Audio System Passport" - Make sure you get this code with the radio otherwise it's a real hassle to recover the code either via dodgy online methods or via the Fiat dealer.
In my case, the radio started working immediately after the code was entered (except for CarPlay). It wasn't until the next power cycle that the odometer started flashing. This indicates that you need to perform a "proxy alignment" to register the radio with your car.
Step 6 - PROXI Alignment
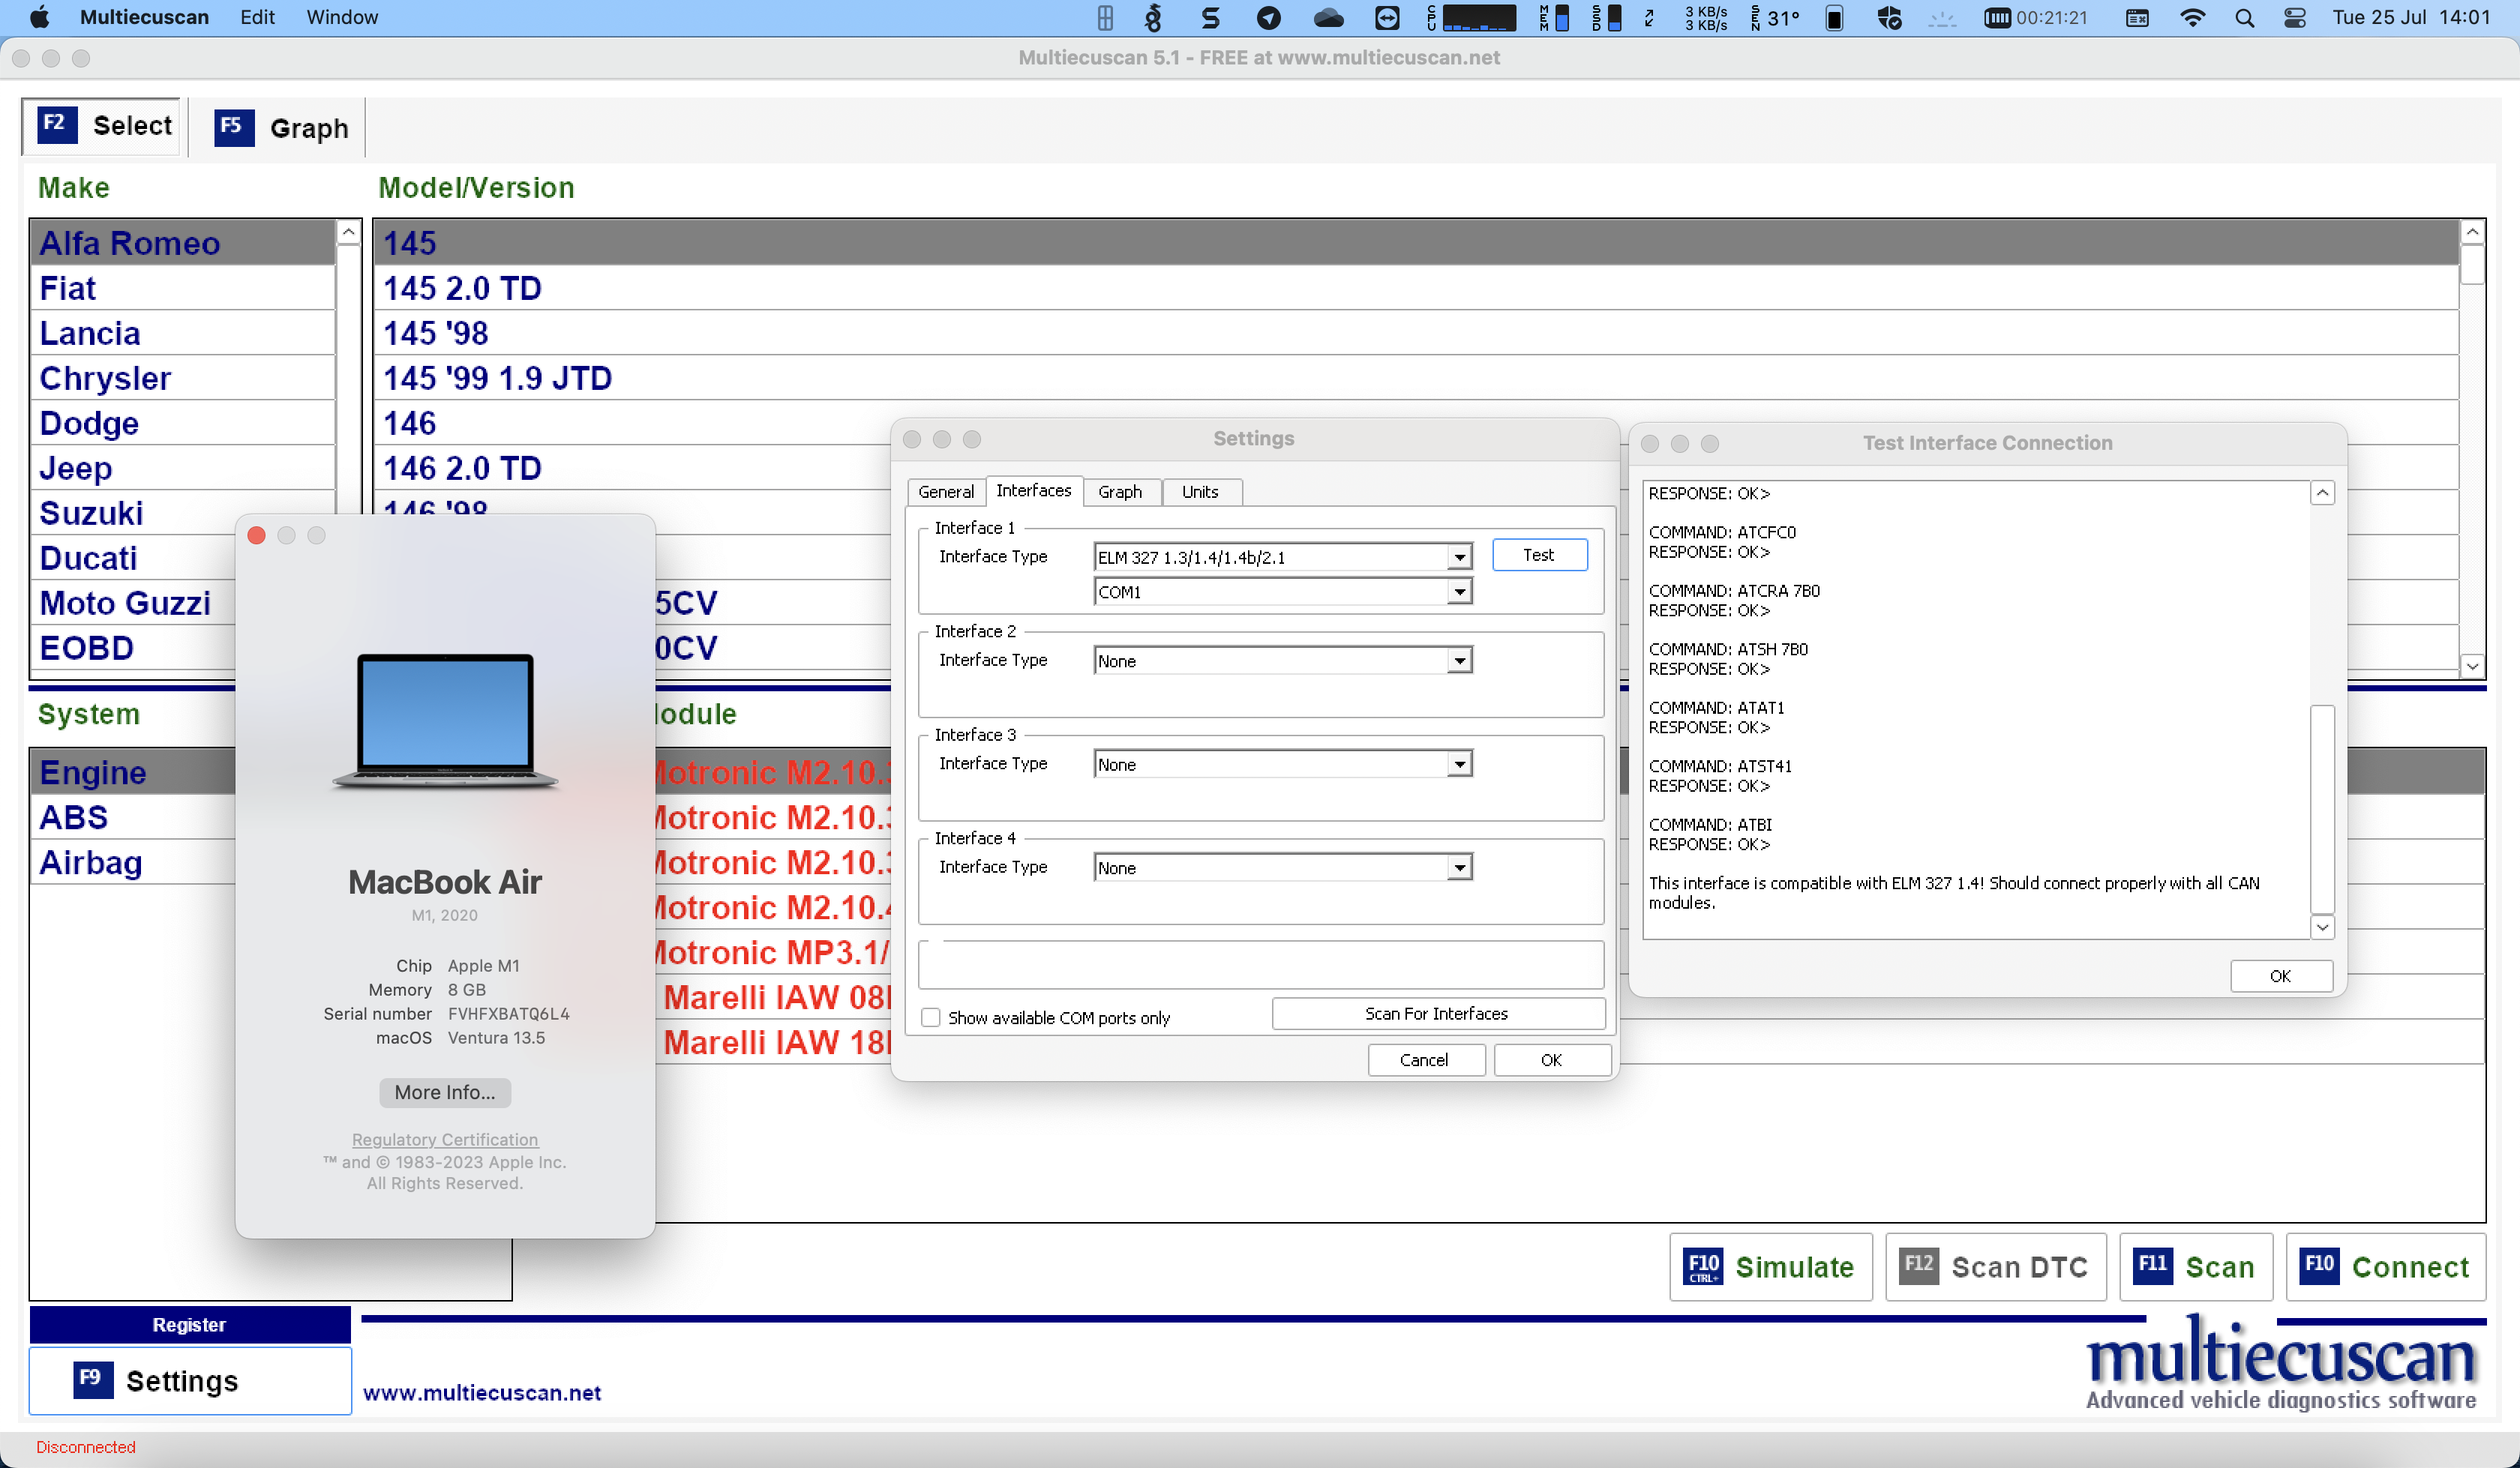
These next steps require an OBD2 cable (or Bluetooth / WiFi alternative). The one I used is is the OBD2 to USB ELM327 Cable Scan Tool. You also need the "Yellow" adapter from the Alfa & Fiat OBD2 MultiECUScan Adaptor Cable Set. You also need a piece of software called MultiECUScan. You will need at least the Registered version. This software ran great on my Macbook Pro running Windows inside VMWare Fusion. I was also able to get it working great on my Macbook Air M1 (Apple Silicon) - scroll to the bottom of this article for more detailed instructions on how to do that. Obviously any Windows machine will do as well. You plug the OBD2 cable into the socket located behind a cover between the steering wheel and the door.
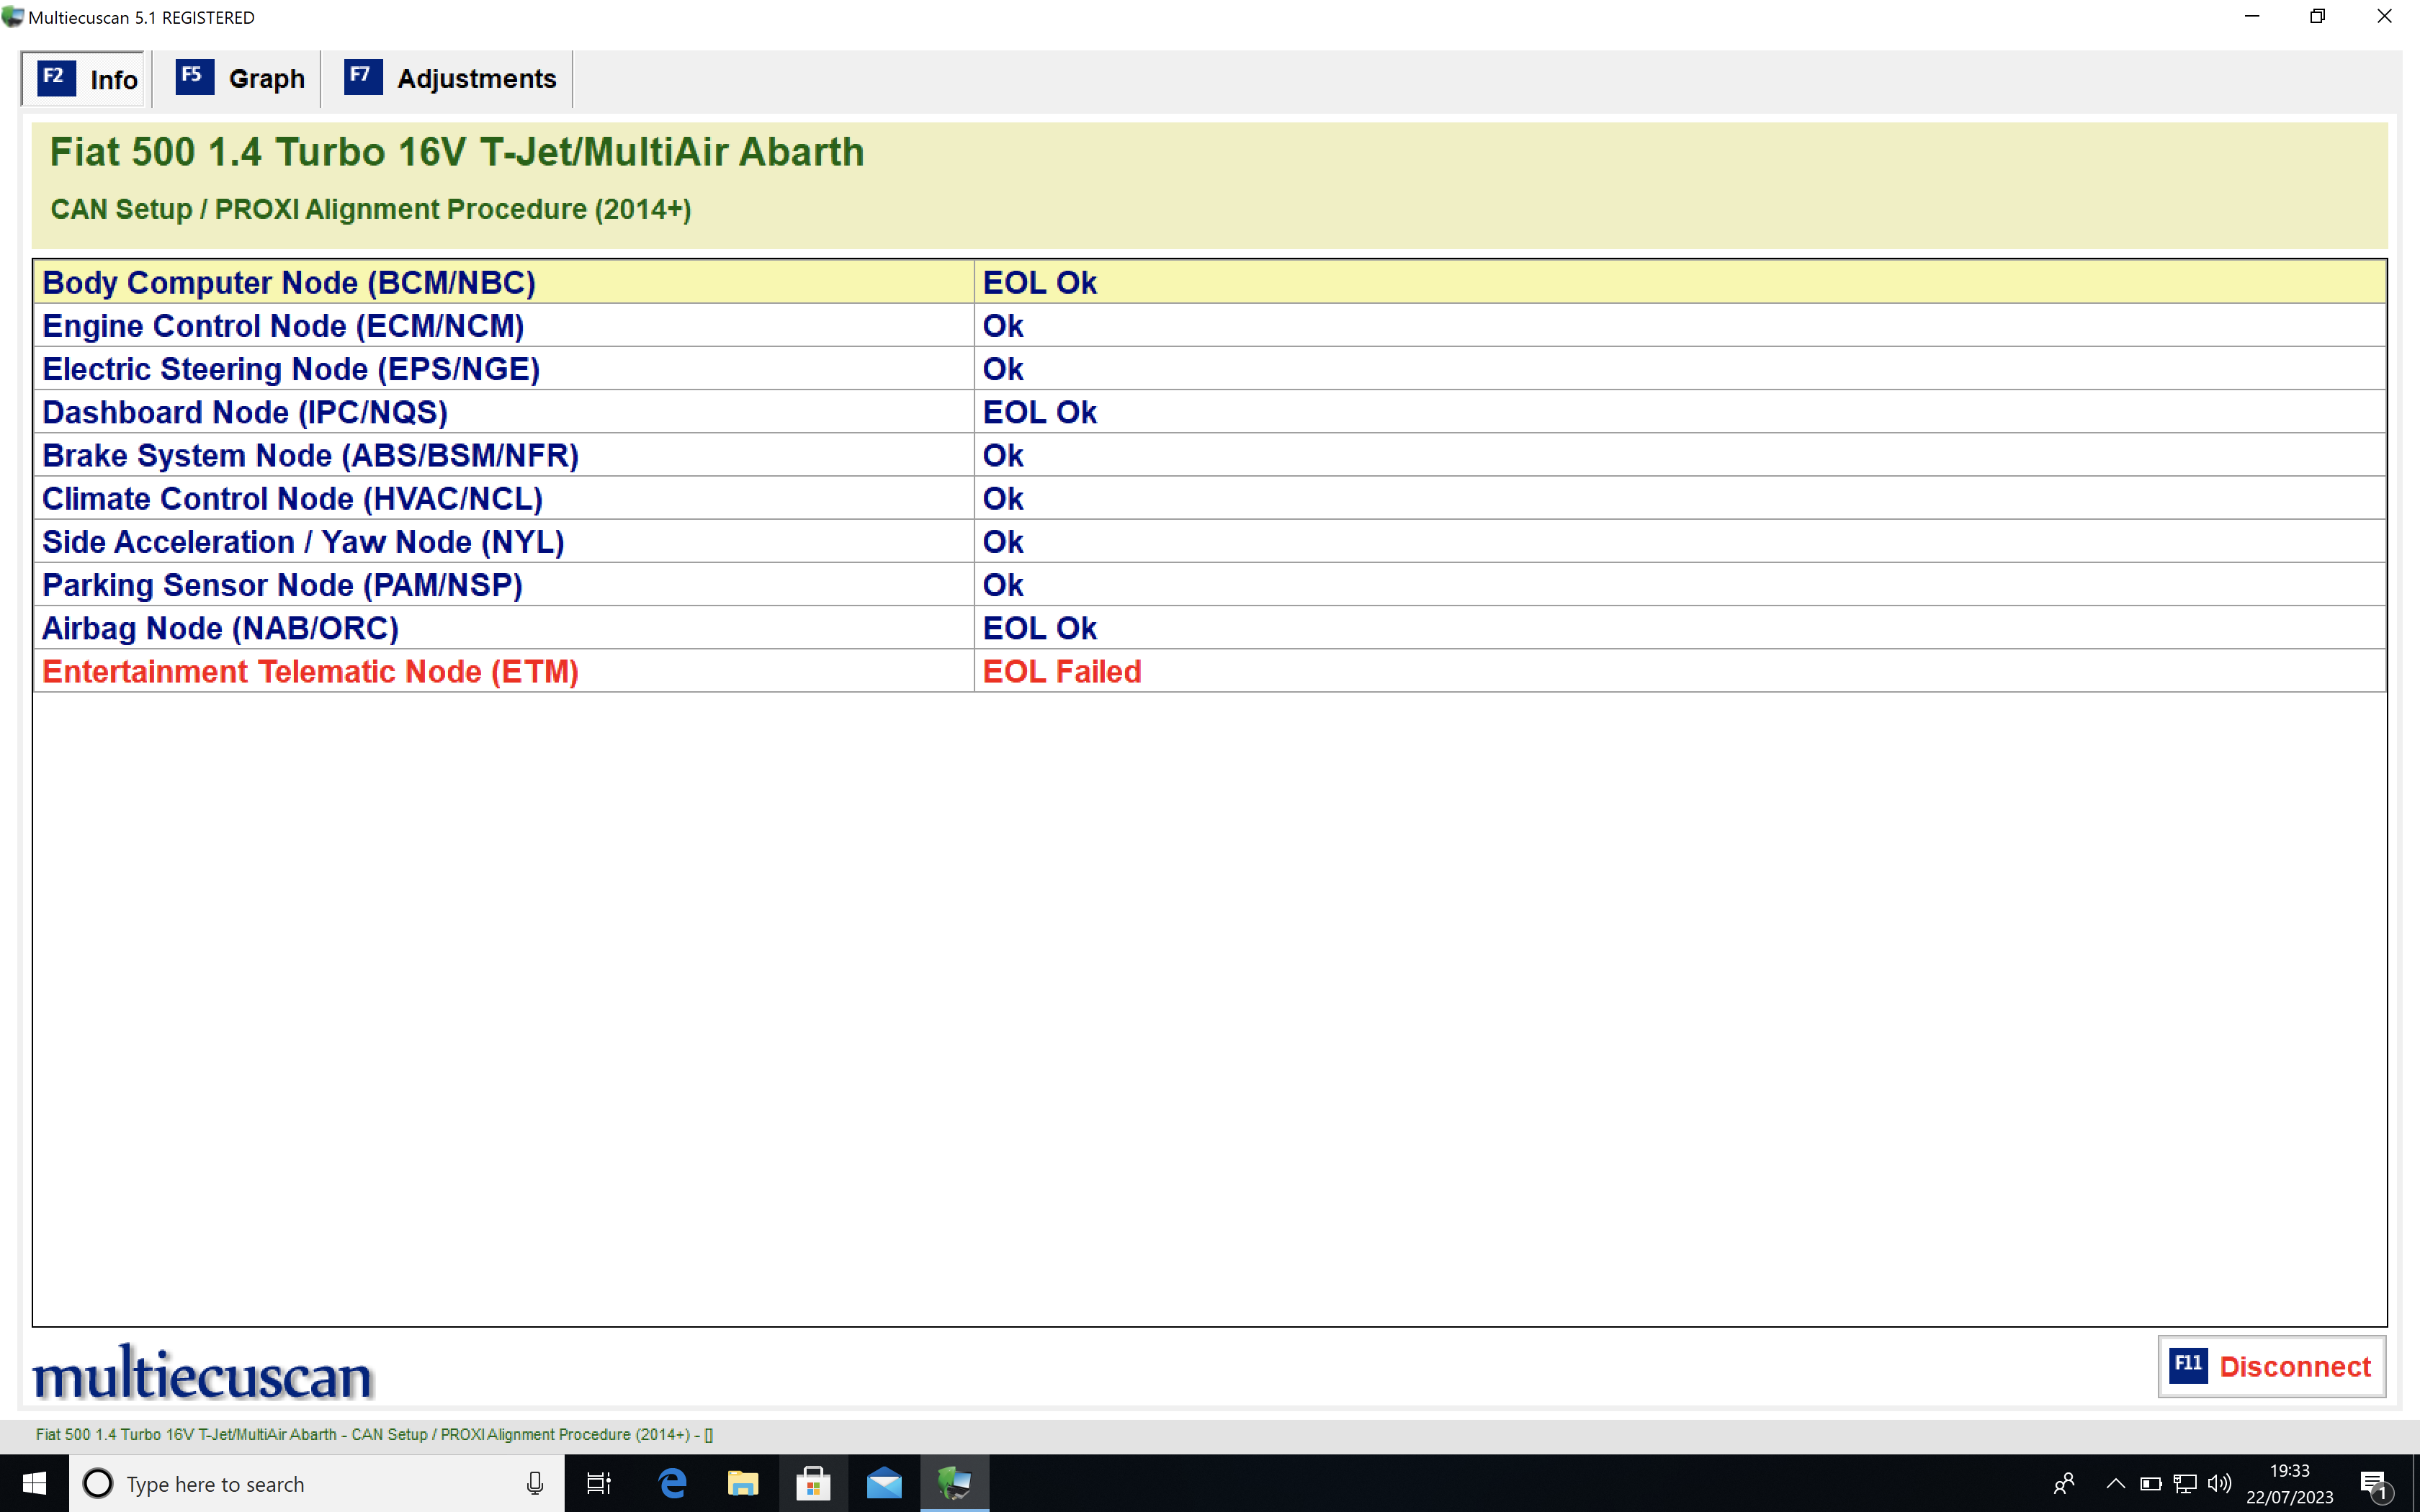
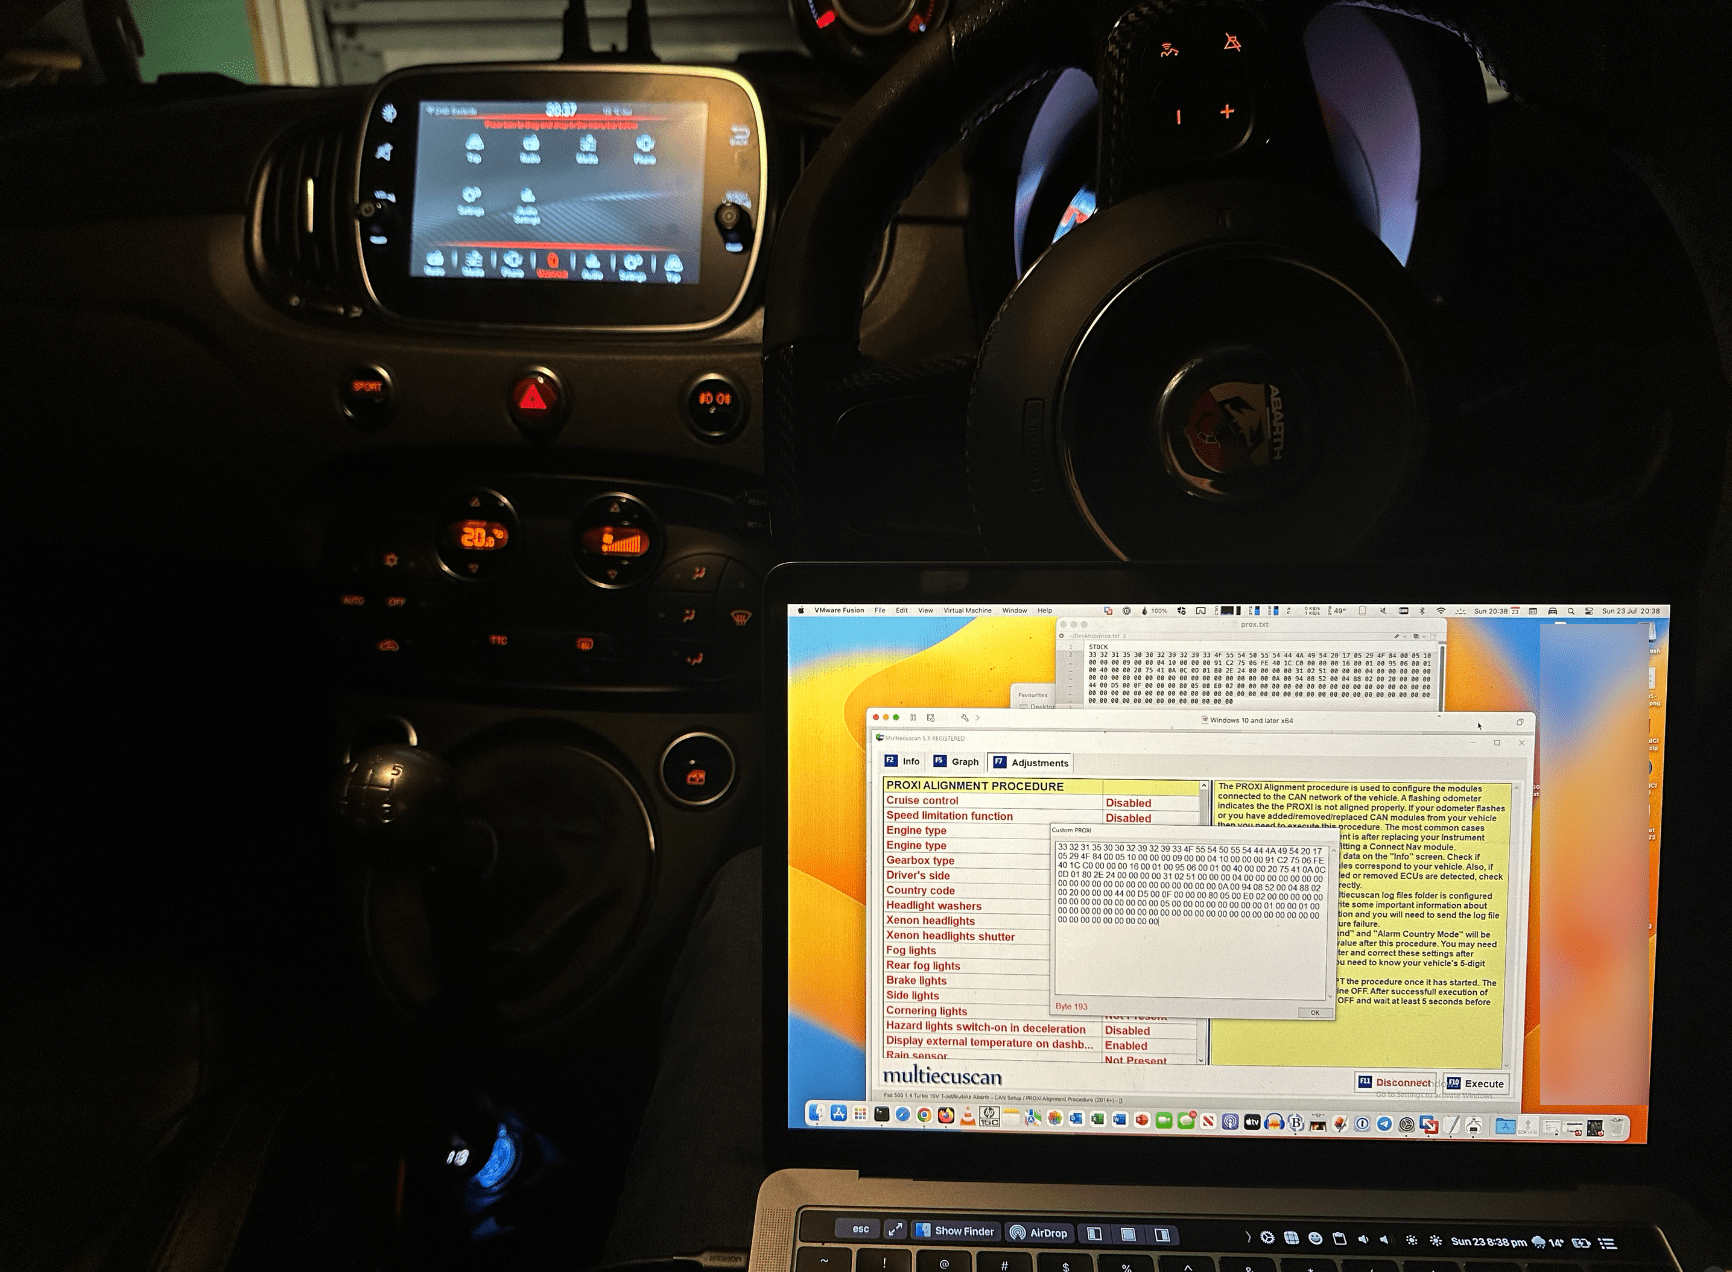
Once connected, you go to to the MultiECUScan software and select your vehicle and go to the CAN Setup / PROXI Alignment Procedure screen relevant to your vehicle. With the odometer flashing, you will get this EOL Failed error as shown.
Then click on the Adjustments tab (F7) and select PROXI ALIGNMENT PROCEDURE and then click Execute (F10). At this point I was psyched with how smoothly everything was going. Then got hit with this error message. FAILED! WRITING PROXI DATA Entertainment Telematic Node (ETM)... FAILED! - Request out of range error. This appears to be caused by an increased length of the proxy code required for this new radio. **IMPORTANT: At this point, there will be an error created in the MultiECUScan log file (by default they are in C:\Program Files (x86)\Multiecuscan\ but you can also chose where they go in the Multiecuscan settings). Keep a copy of this as it will contain your initial proxy configuration. If you ever screw anything up, you'll at least want to be able to get back to the original settings.
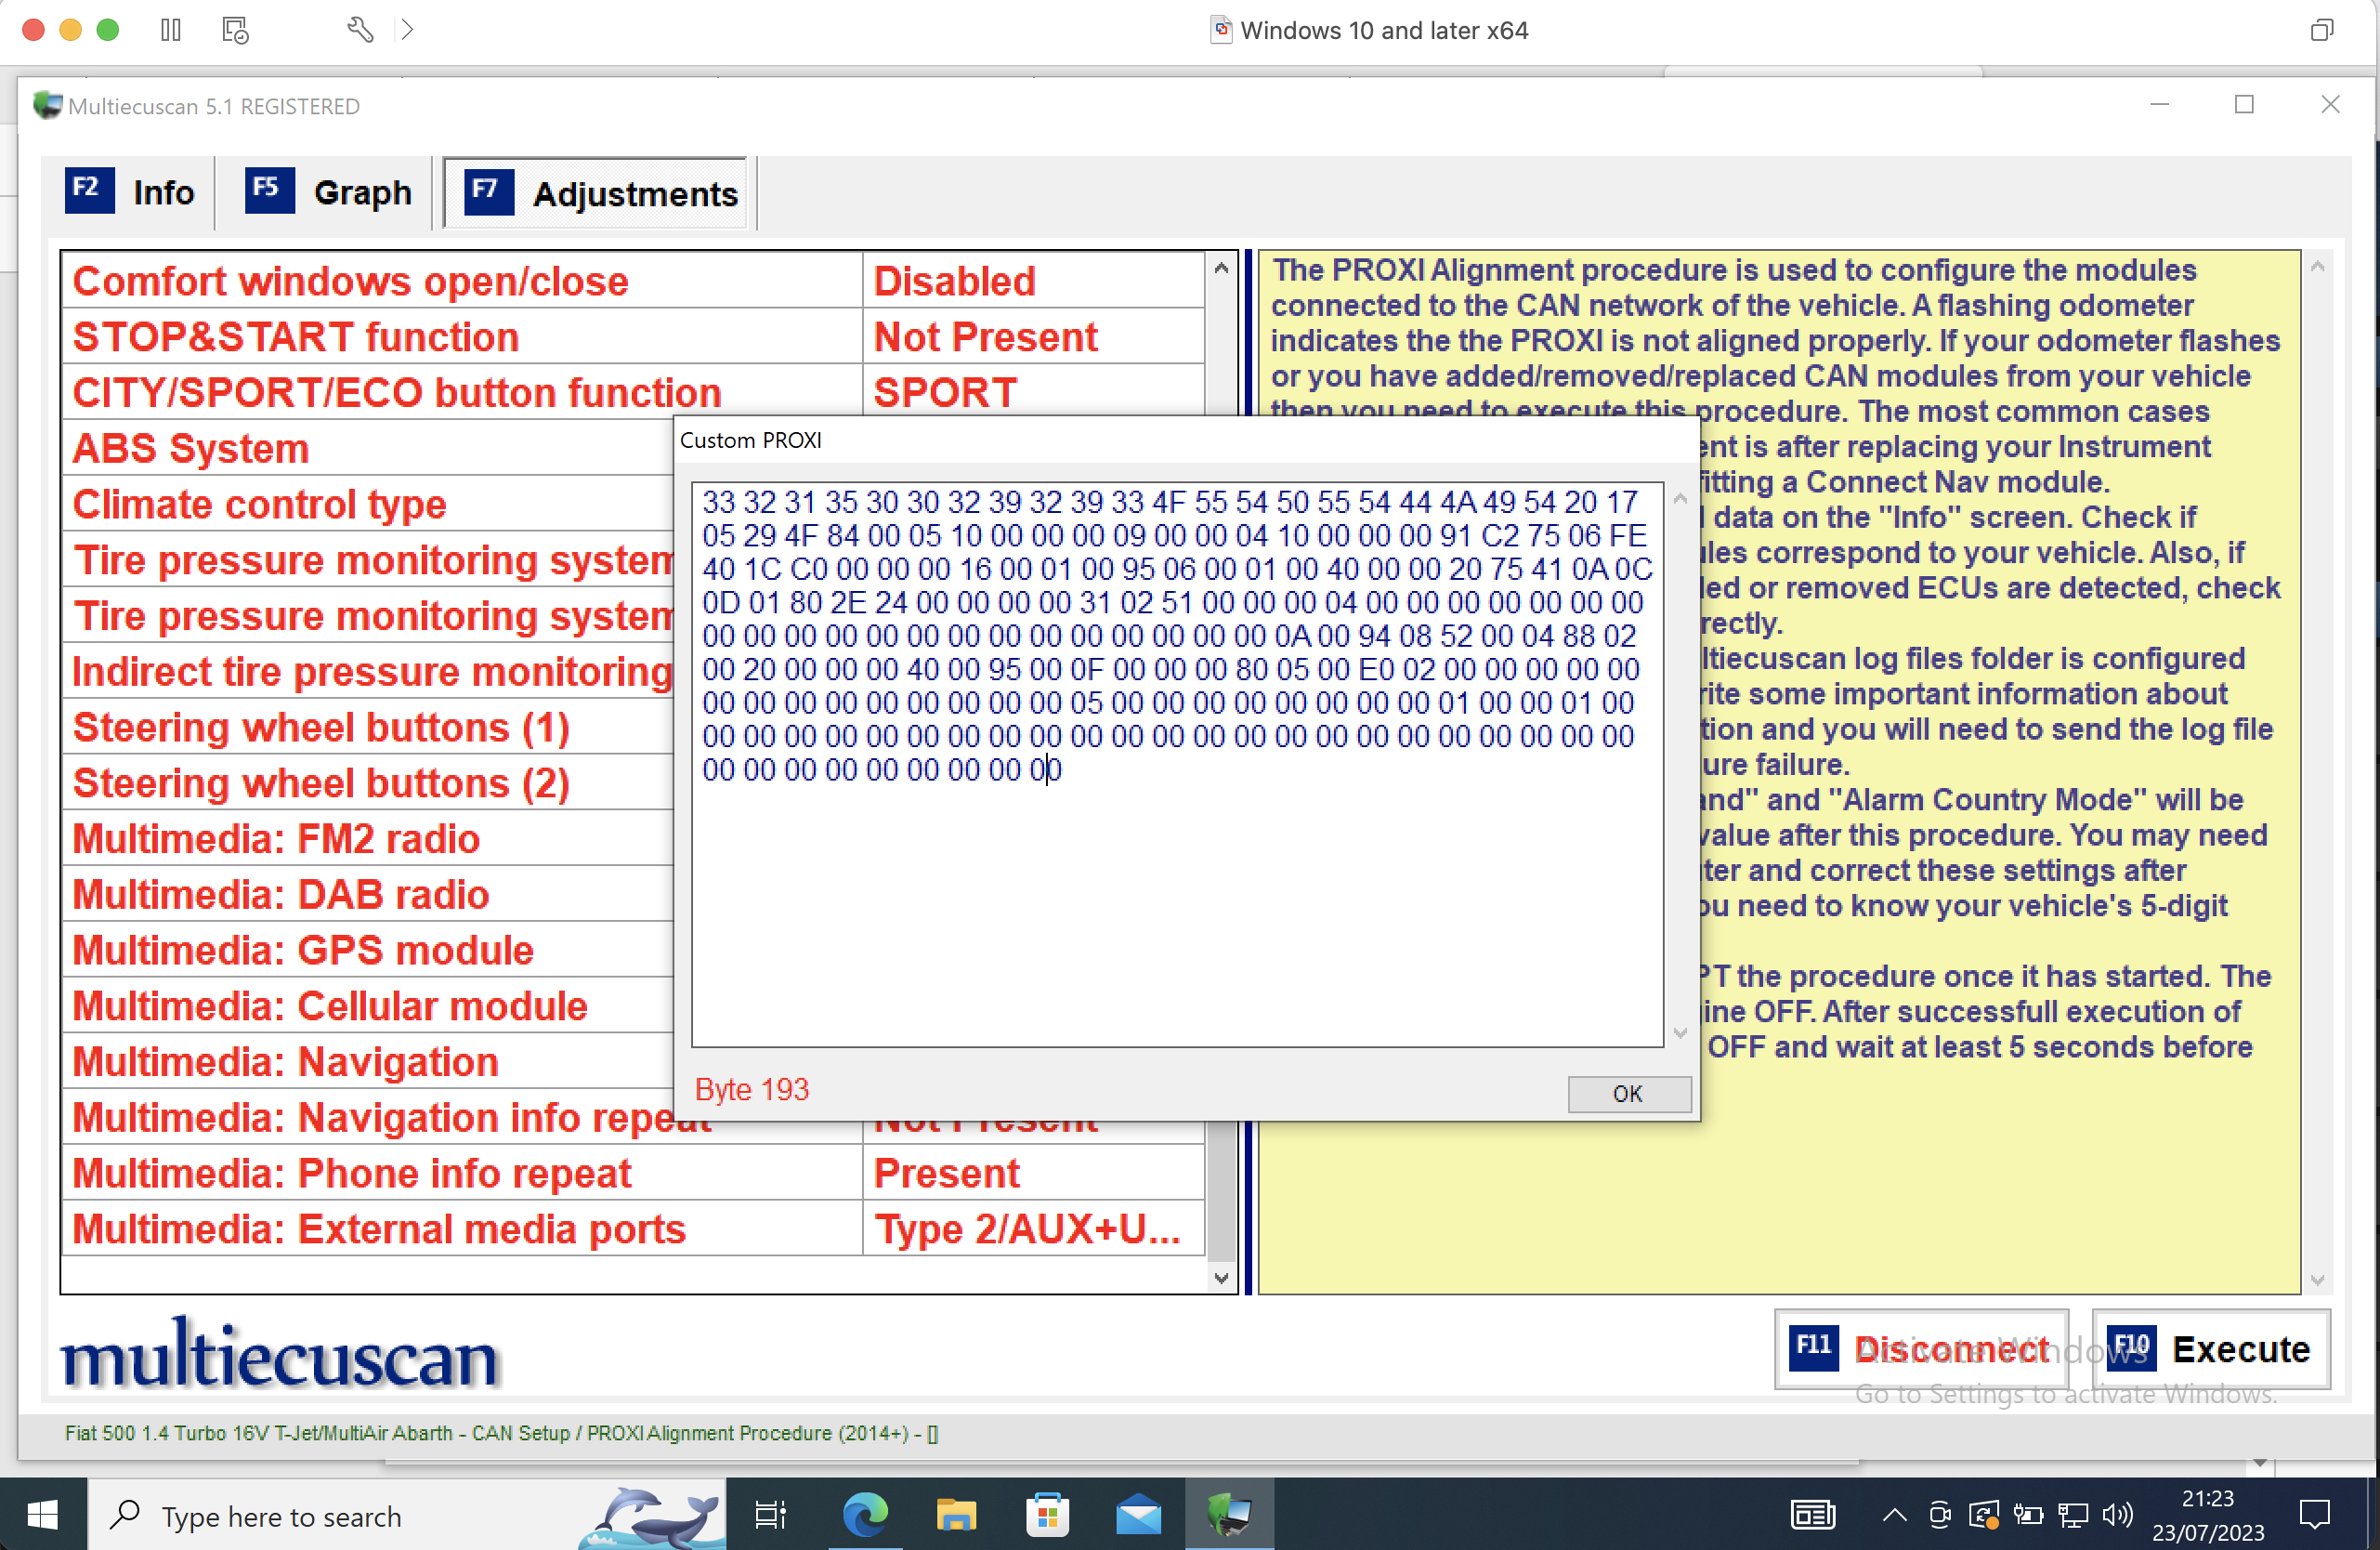
The next step is a bit of a non-obvious trick, but you need to get into the Custom PROXI setup. To do this from the Adjustments screen, you type CTR-ALT-C (or on my Mac running VMWare it was CTR-OPT-C). This will bring up the Custom PROXI window. As you scroll across those numbers you can see the "Byte #" written in red. Click to enlarge my screen shot. Here you can see that I've had to pad out the Custom PROXI out to Byte 193. You do this wth adding groups of 00s as shown. You simply use the keyboard to enter those numbers, you can also cut/paste. I would definitely store a copy of your original settings. Also you want to make sure that you set the following bytes (as I have done in the screen shot):
- Byte 30 = 10
- Byte 38 = 10
- Byte 121 = 40 NAV (44 for NAV+Audio)
- Byte 123 = D5 DAB
- Byte 130 = 05 Abarth logo (01 for Fiat logo)
- Byte 148 = 05 Uconnect 7"
- Byte 157 = 01 Apple CarPlay
- Byte 158 = 00
- Byte 159 = 00
- Byte 160 = 01 Android Auto
Then you can click on OK and Execute the custom alignment which should then work. Your radio will reboot and you should turn the key off for a few seconds. When everything comes back up you should be all set to go! You should see that 1) The odometer is no longer flashing, 2) the radio buttons on the steering wheel control the Uconnect, 3) the microphone works to take voice commands, 4) the clock and trip odometer are synchronised between the gauge cluster and the radio, 5) all the radio functions work and music comes out of the speakers, 6) the antenna is working to allow the radio to tune AM, FM and DAB stations.
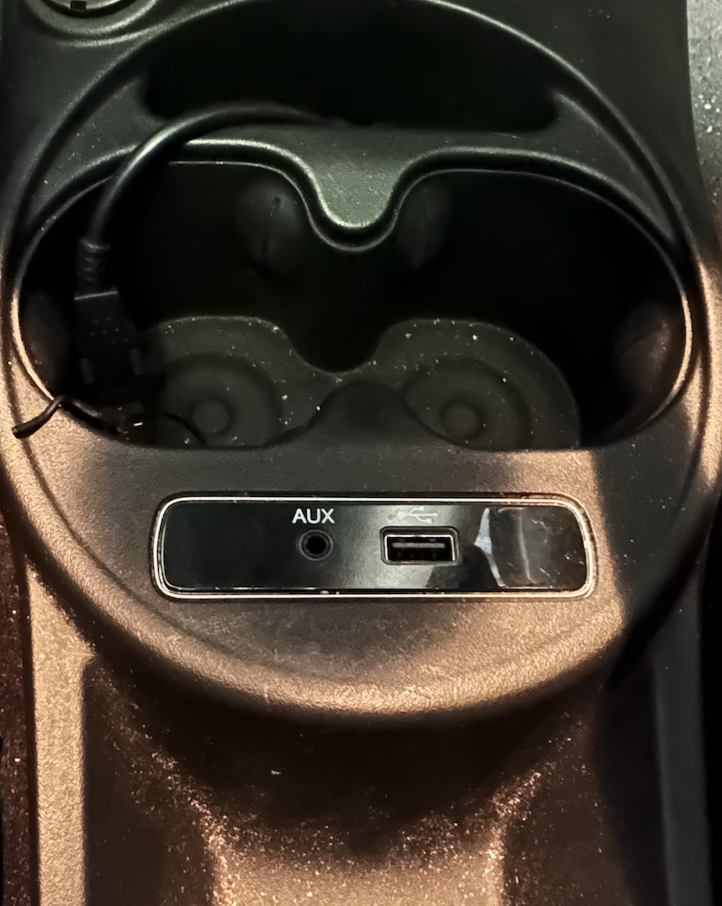
Except, I still had one other challenge. Apple CarPlay didn't work. When I tested the radio in the donor car, it worked fine with CarPlay using the exact same phone/cable. The only difference is that the donor car had a double USB port in the centre console, while mine was this AUX+USB version. One thing to confirm is that when you do the PROXI alignment you set "Multimedia: External media ports" to the correct setting for your car - by default unless you change the port itself, it should be correct. In my case it was "Type 2/AUX+USB". It seems that this Type 2 port is more sensitive to the cable than the one in the donor car. I tried with an original Apple USB cable and it worked immediately. Something to keep in mind if you've done all the steps above and the CarPlay is still not working. It's likely that some cables may have too much of a voltage drop.
In the course of my research to get this sorted, I found some interesting info that didn't help in my case, but they may be good leads for others with problems.
Byte 148 - In my case this definitely needed to be 05. Some others have suggested 1D, 01 or even 45. For me, if I used anything other than 05 (or 45) it would fail with the out of range error.
This thread https://www.goingelectric.de/forum/viewtopic.php?f=237&t=54795&start=20 had a few different settings, neither of which did anything special for me.
- Byte 148 from 05 to 45 -> Rebooted radio, but no change noticed
- Byte 157 from 01 to 05 -> Rebooted radio, but no change noticed
- Byte 160 from 01 to 05 -> Rebooted radio, but no change noticed
- Byte 132 from E0 to A0 -> Rebooted radio, but no change noticed
- Byte 133 from 02 to 01 -> Did not cause a reboot, no change noticed
From this thread: http://forum.multiecuscan.net/viewtopic.php?t=6441&start=20
- Byte 140 from 00 to 70 -> Rebooted radio, but no change noticed
- Byte 193 from 00 to 80 -> Rebooted radio, but no change noticed
From someone at bkar.ch
- Byte 67 = 41 with Side Bags / 40 without Side Bags
There are also some good discussion on this thread: https://www.fiatforum.com/threads/newbie-upgrading-to-apple-carplay.453736/page-3
I also got help from people on the OzAbarth Facebook Group on this thread: https://www.facebook.com/groups/OzAbarth/?multi_permalinks=2855624731251881¬if_id=1690110830744084¬if_t=feedback_reaction_generic
After publishing this post, I found this which is super-detailed and step-by-step - though you need to be a member of the Abarth Owners Club on Facebook: https://www.facebook.com/groups/abarthownerclub/permalink/1465629076968584
In case it helps anyone else, here are my Before/After PROXI settings:
BEFORE - STOCK AU SPEC 2017 ABARTH 595 COMP w/XENON SUNROOF 5SP
33 32 31 35 30 30 32 39 32 39 33 4F 55 54 50 55 54 44 4A 49 54 20 17 05 29 4F 84 00 05 10 00 00 00 09 00 00 04 10 00 00 00 91 C2 75 06 FE 40 1C C0 00 00 00 16 00 01 00 95 06 00 01 00 40 00 00 20 75 41 0A 0C 0D 01 80 2E 24 00 00 00 00 31 02 51 00 00 00 04 00 00 00 00 00 00 00 00 00 00 00 00 00 00 00 00 00 00 00 00 00 0A 00 94 08 52 00 04 88 02 00 20 00 00 00 44 00 D5 00 0F 00 00 00 80 05 00 E0 02 00 00 00 00 00 00 00 00 00 00 00 00 00 00 00 00 00 00 00 00 00 00 00 00 00 00 00 00 00 00 00 00 00 00 00 00 00 00 00 00 00 00 00 00 00 00 00 00 00 00 00 00 00 00 00 00 00 00 00 00
AFTER - WORKING WITH UCONNECT and CARPLAY
33 32 31 35 30 30 32 39 32 39 33 4F 55 54 50 55 54 44 4A 49 54 20 17 05 29 4F 84 00 05 10 00 00 00 09 00 00 04 10 00 00 00 91 C2 75 06 FE 40 1C C0 00 00 00 16 00 01 00 95 06 00 01 00 40 00 00 20 75 41 0A 0C 0D 01 80 2E 24 00 00 00 00 31 02 51 00 00 00 04 00 00 00 00 00 00 00 00 00 00 00 00 00 00 00 00 00 00 00 00 00 0A 00 94 08 52 00 04 88 02 00 20 00 00 00 40 00 95 00 0F 00 00 00 80 05 00 E0 02 00 00 00 00 00 00 00 00 00 00 00 00 00 00 05 00 00 00 00 00 00 00 00 01 00 00 01 00 00 00 00 00 00 00 00 00 00 00 00 00 00 00 00 00 00 00 00 00 00 00 00 00 00 00 00 00 00 00 00 00
How to run Multiecuscan on MacOS using Crossover on an Apple Silicon M1 Macbook
Many of us don't use Windows and while Multiecuscan has an iOS version, the full desktop version is more flexbile and easier to use. Now with Crossover you can run Multiecuscan on a Mac (even running Apple Silicon M1 or M2 processors) or a Linux based machine. Once you've configured the Multiecuscan it runs just as quickly and nicely as it would on a Windows machine.
Step 1 - Get Crossover here: https://www.codeweavers.com/crossover or it should also work on Wine which is the underpinning technology of Crossover. You can get Wine here: https://www.winehq.org/.
Step 2 - Create a "bottle" and install Multiecuscan. Before you run Multiecuscan, you MUST also install .NET Framework 3.5. There is a built-in process in Crossover to install .NET Framework 3.5 so I would recommend using that approach.
Step 3 - Configure your USB based OBD2 adapter in Crossover using this process.
Step 4 - Load Multiecuscan (and pay for the registered version). You should be able to connect to your OBD module per the screen shot on the left (click on it to enlarge). I actually found that Multiecuscan ran better under Crossover on my M1 Macbook than my Intel Macbook - something to do with the “high DPI scaling” in Windows which I had to fix by right-clicking on the Multiecuscan icon, selecting Properties and the Compatibility tab and then Override high DPI scaling behaviour with System. I didn't need to do this on the M1 under Crossover.
How to access the "Secret Menu" or "Engineering Menu" of the Uconnect 7"
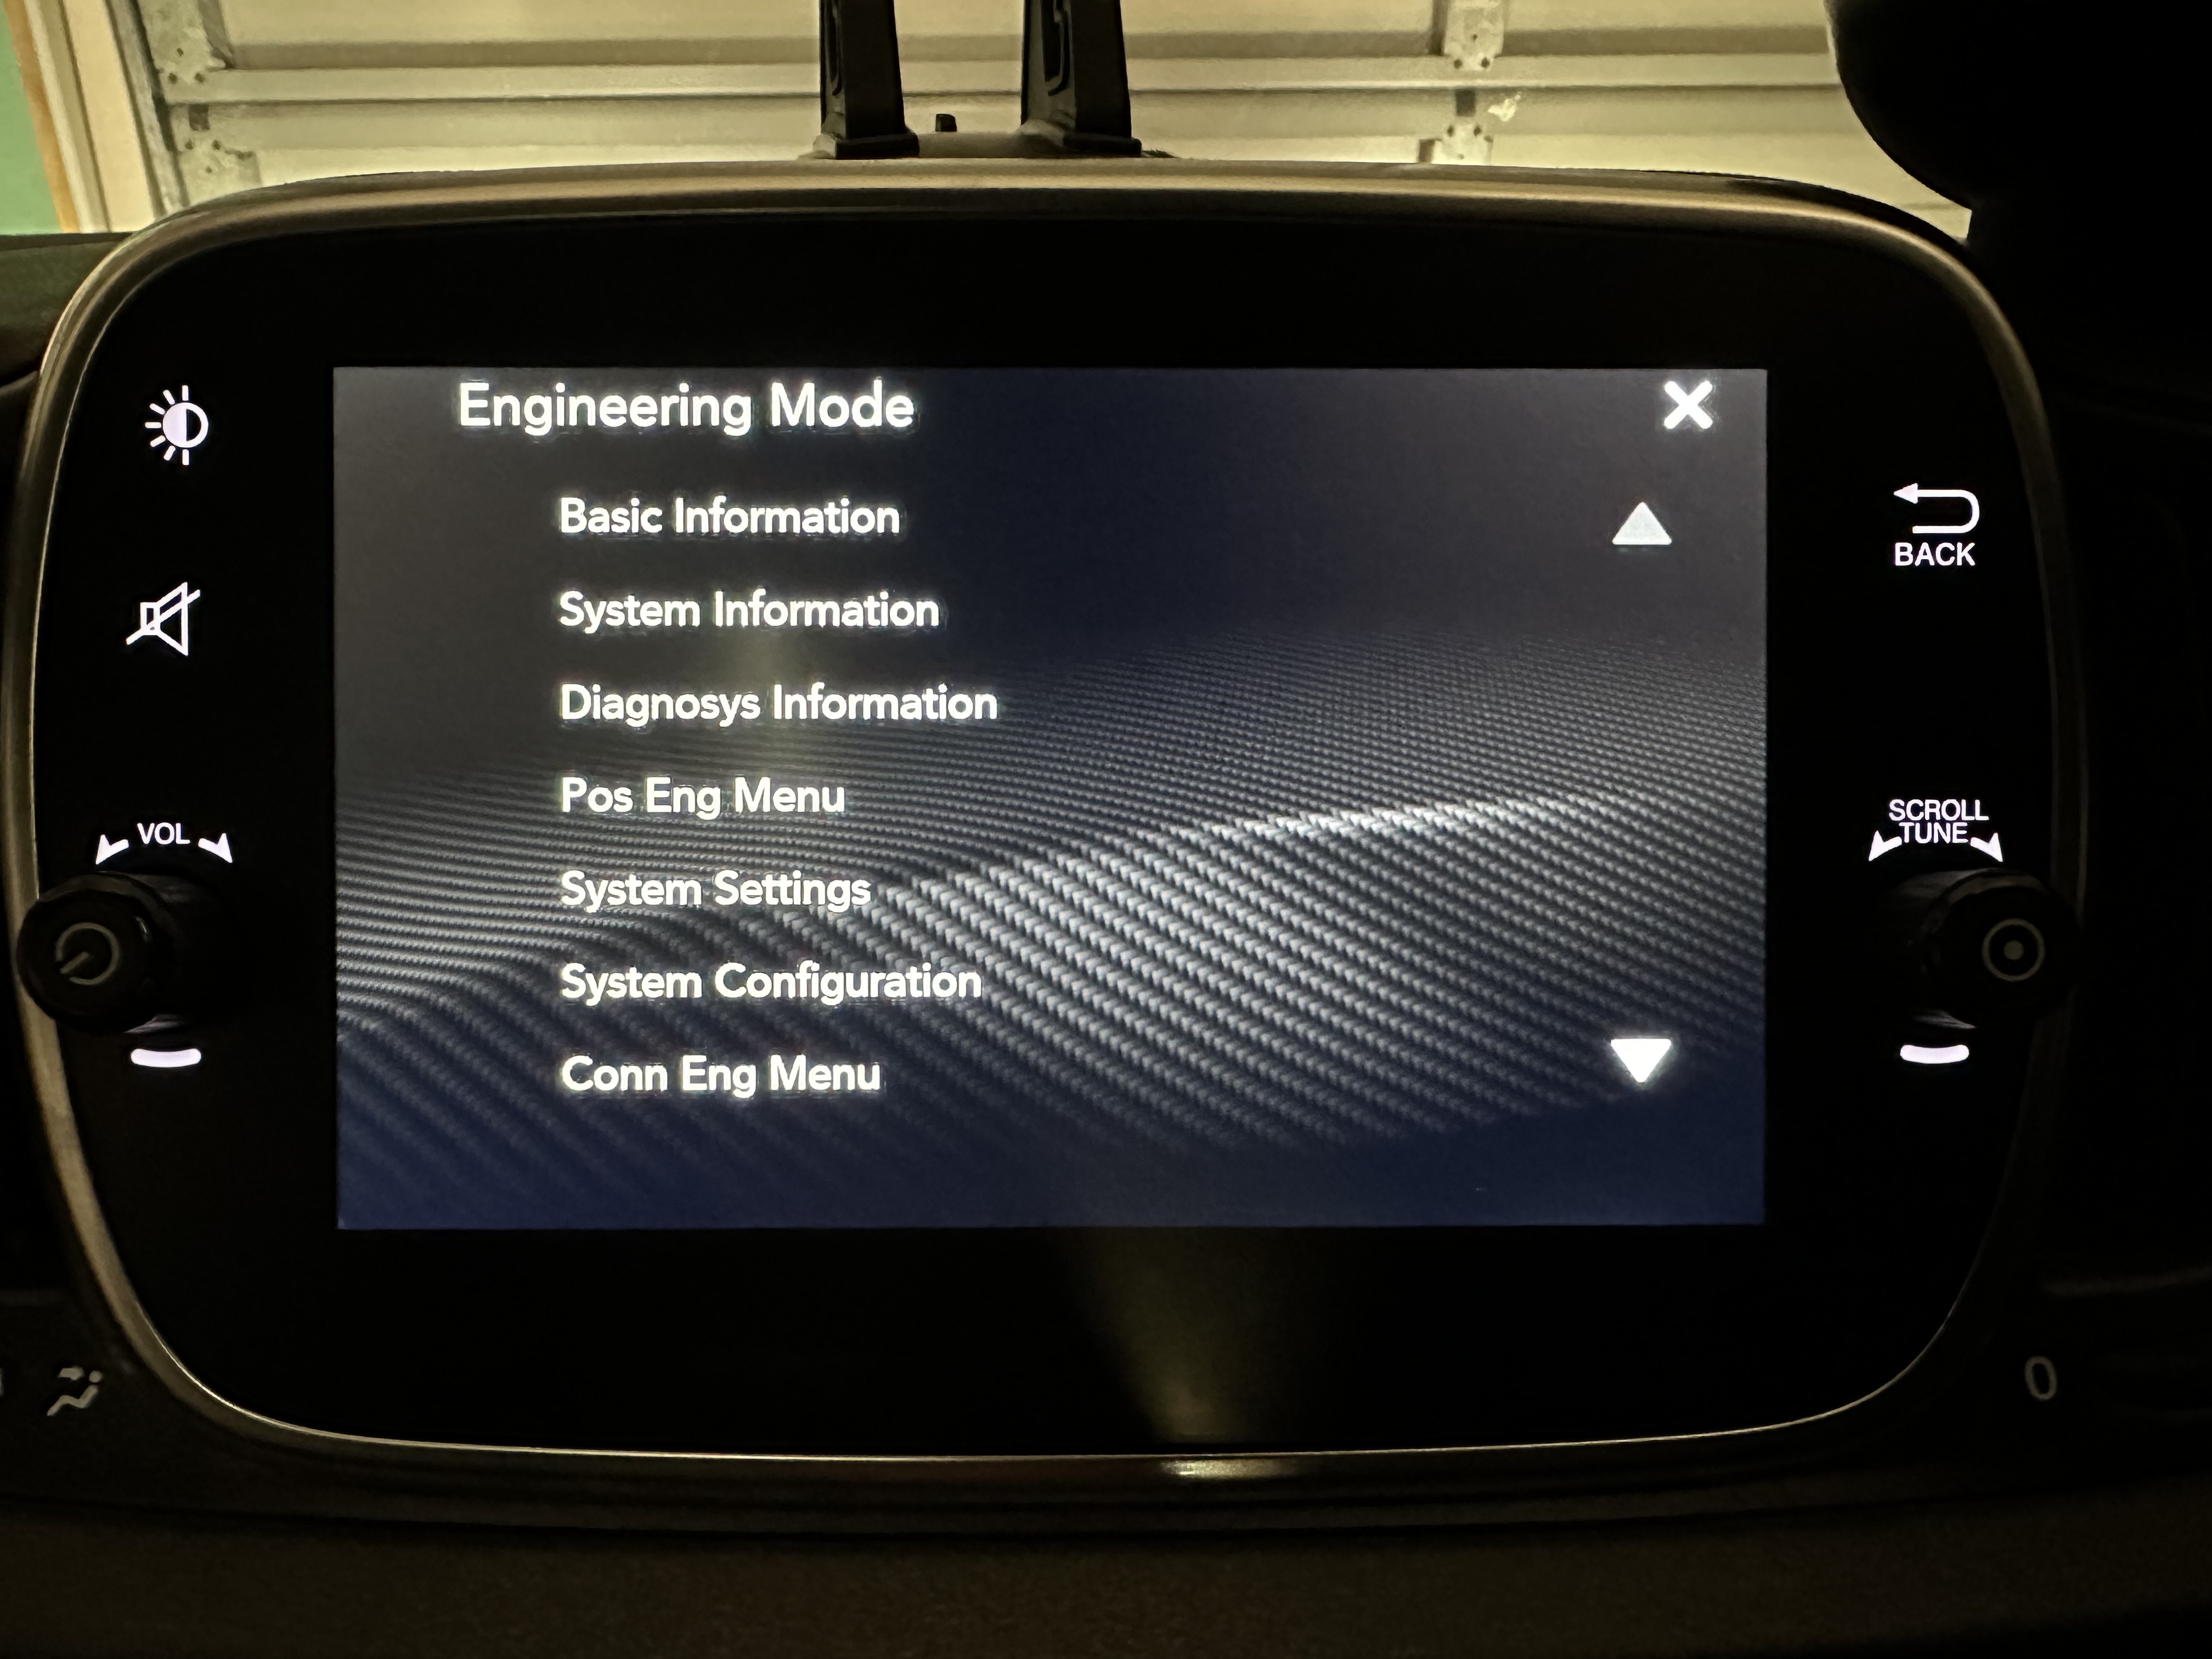
Instructions are based on this YouTube video about the FIAT Tipo's version of the Uconnect. You can click on the little screen shots on the right to see the full-screen version. Once you are in the engineering menu there are a few settings you can change and you can also read out the proxi settings. You can also dump some information to a USB stick.
- Step 0 - Ignition ON (car doesn't need to be started, just ignition ON is fine)
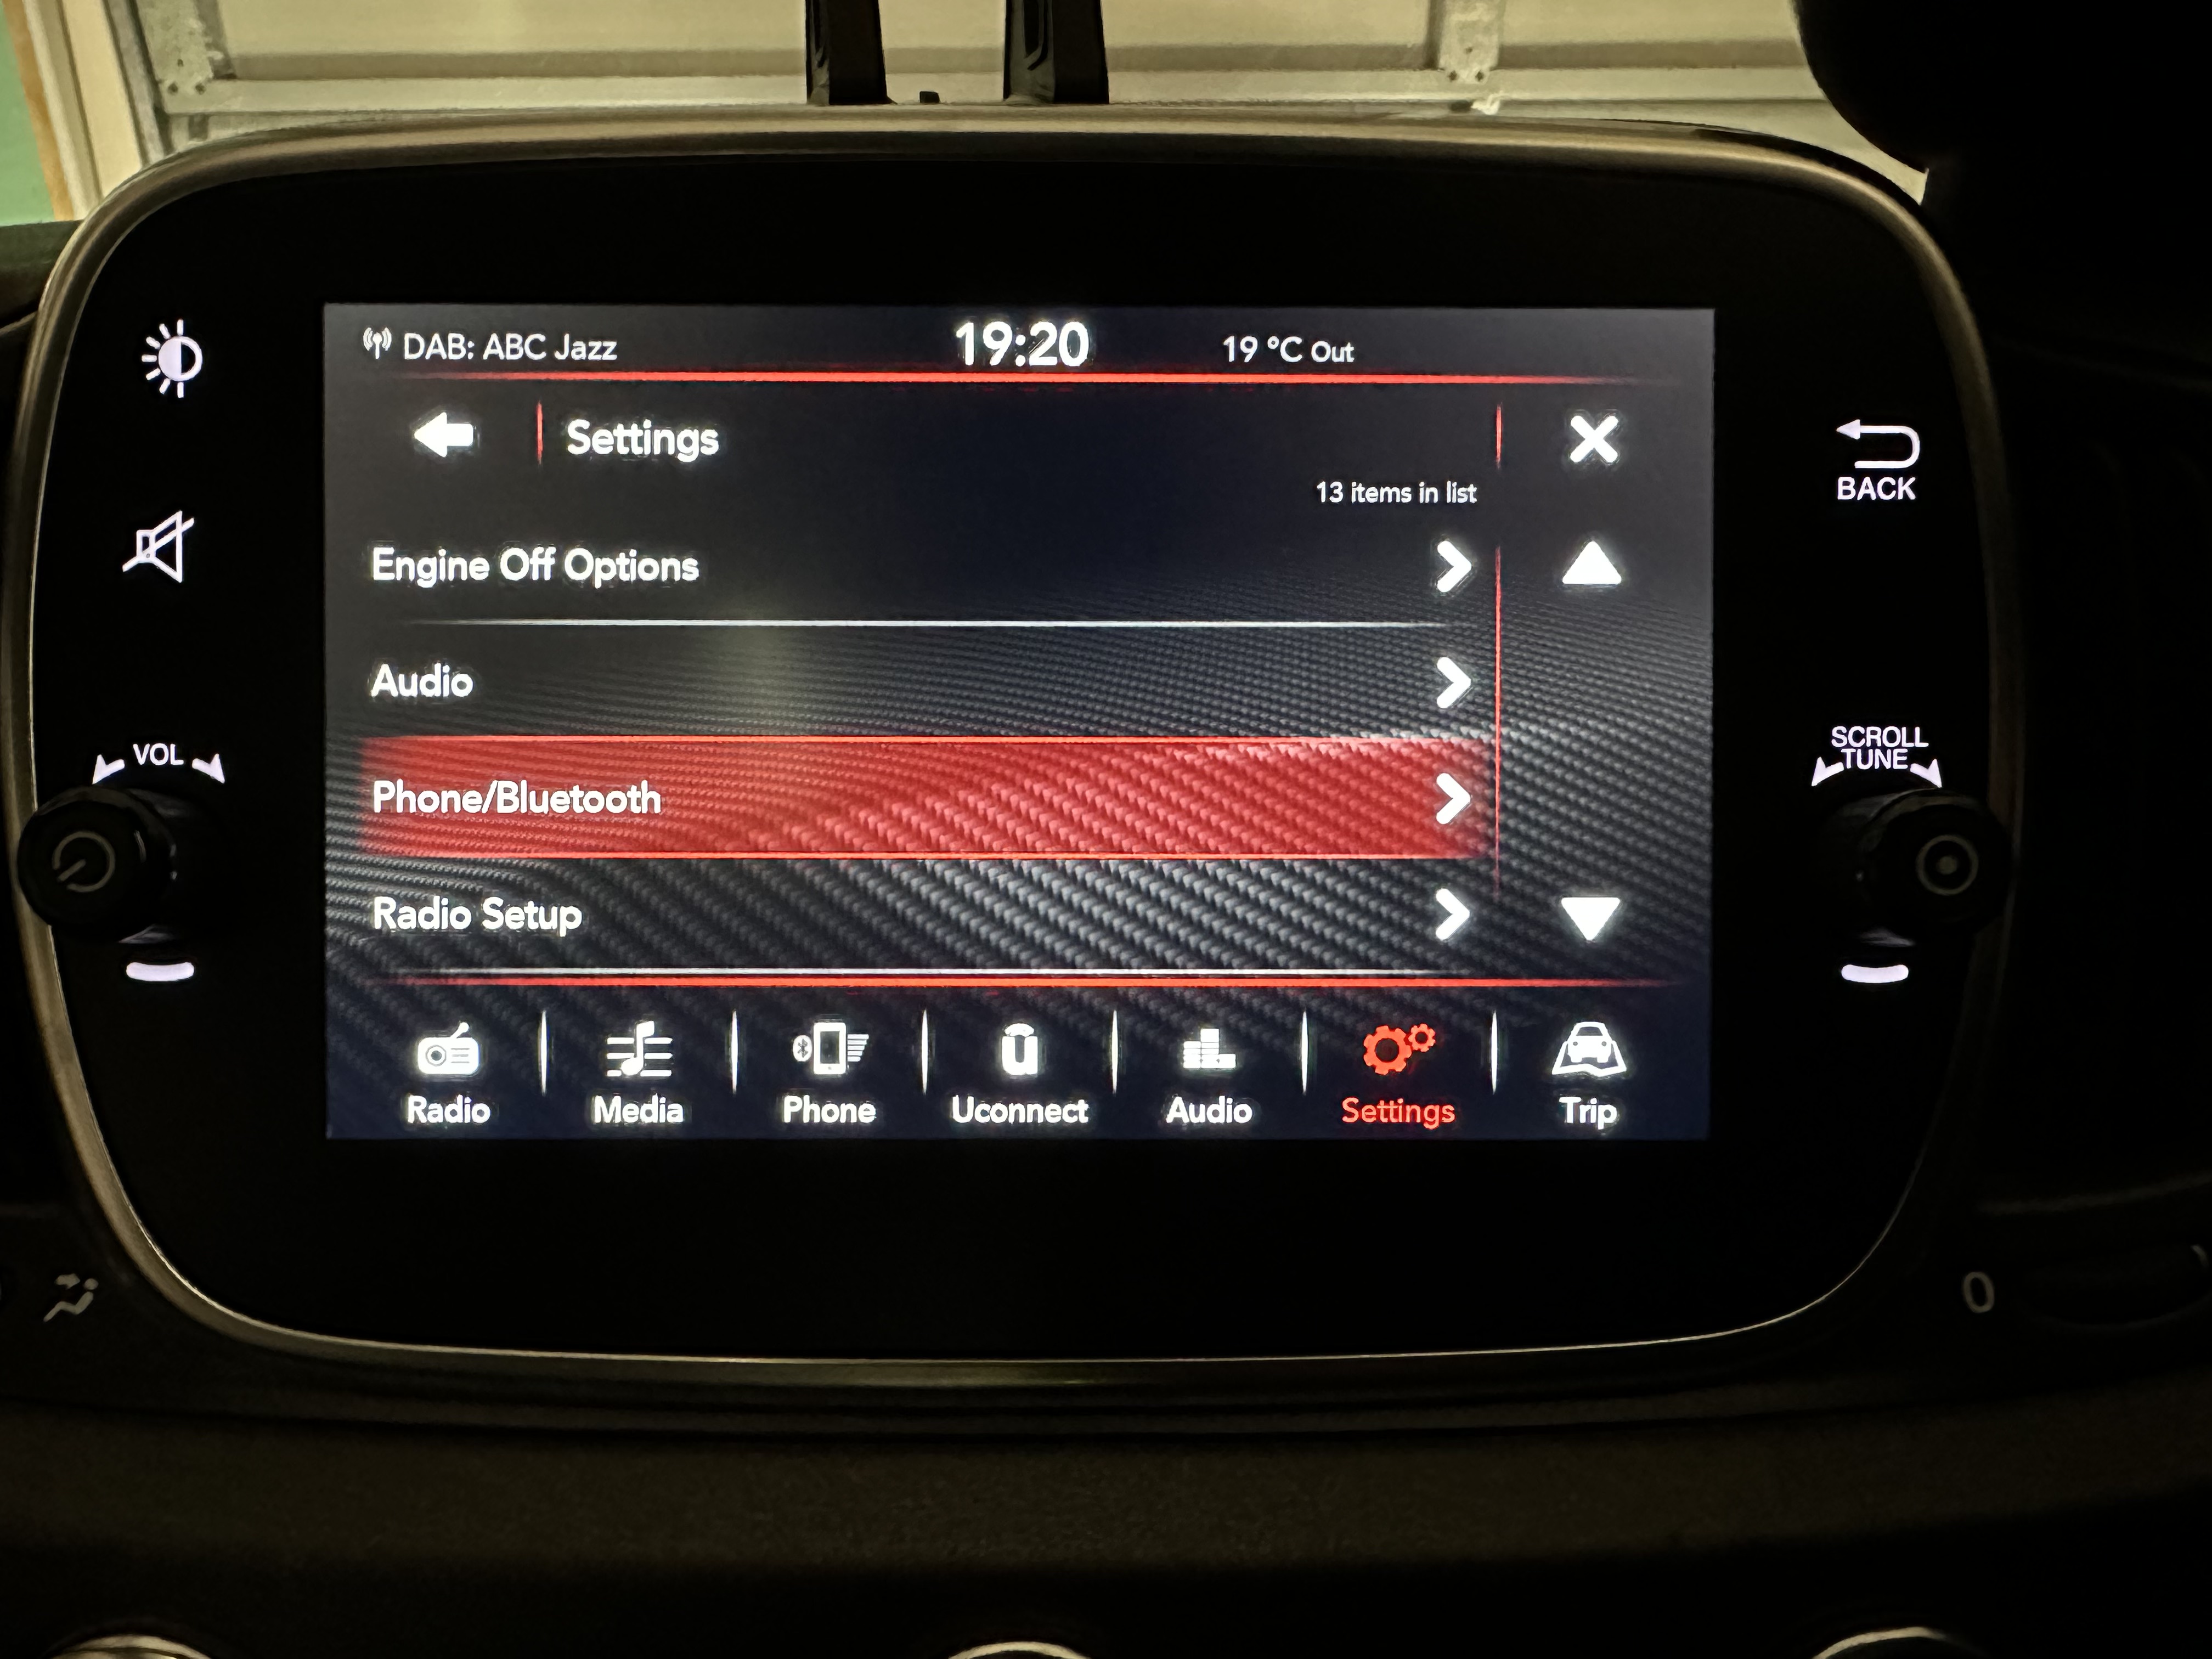
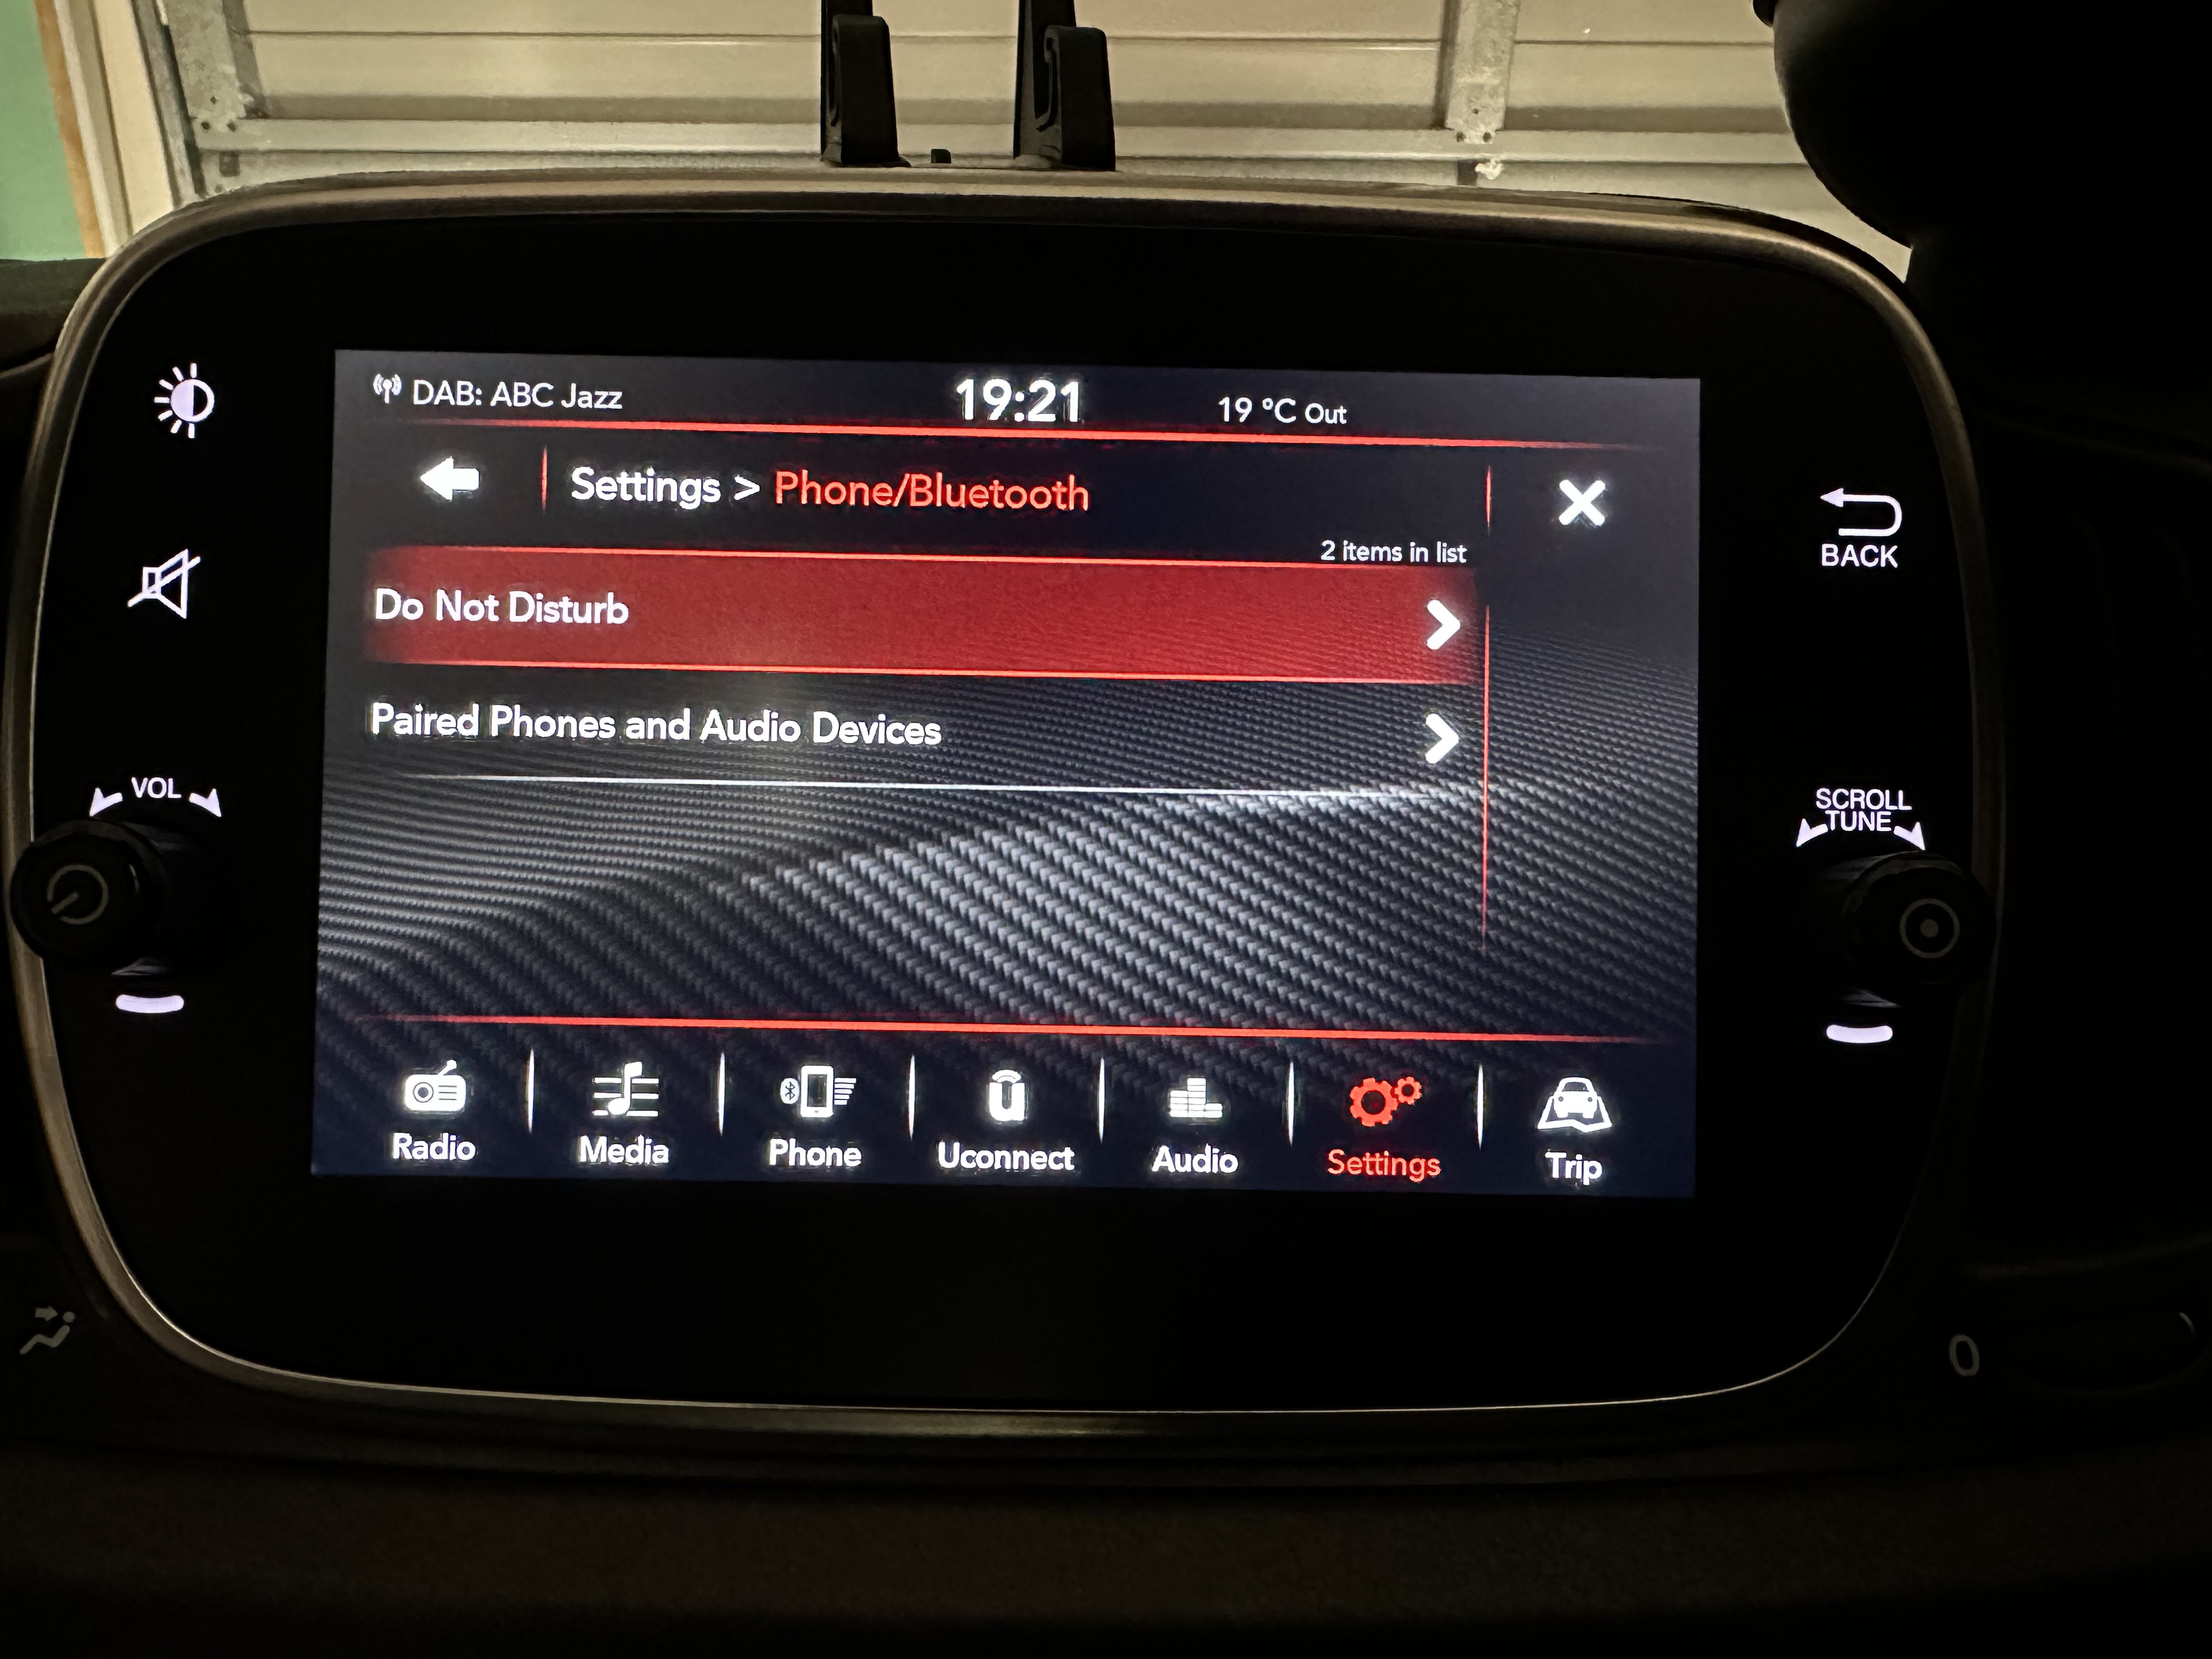
- Step 1 - Navigate to Settings -> Phone/Bluetooth
- Step 2 - Click on Do Not Disturb
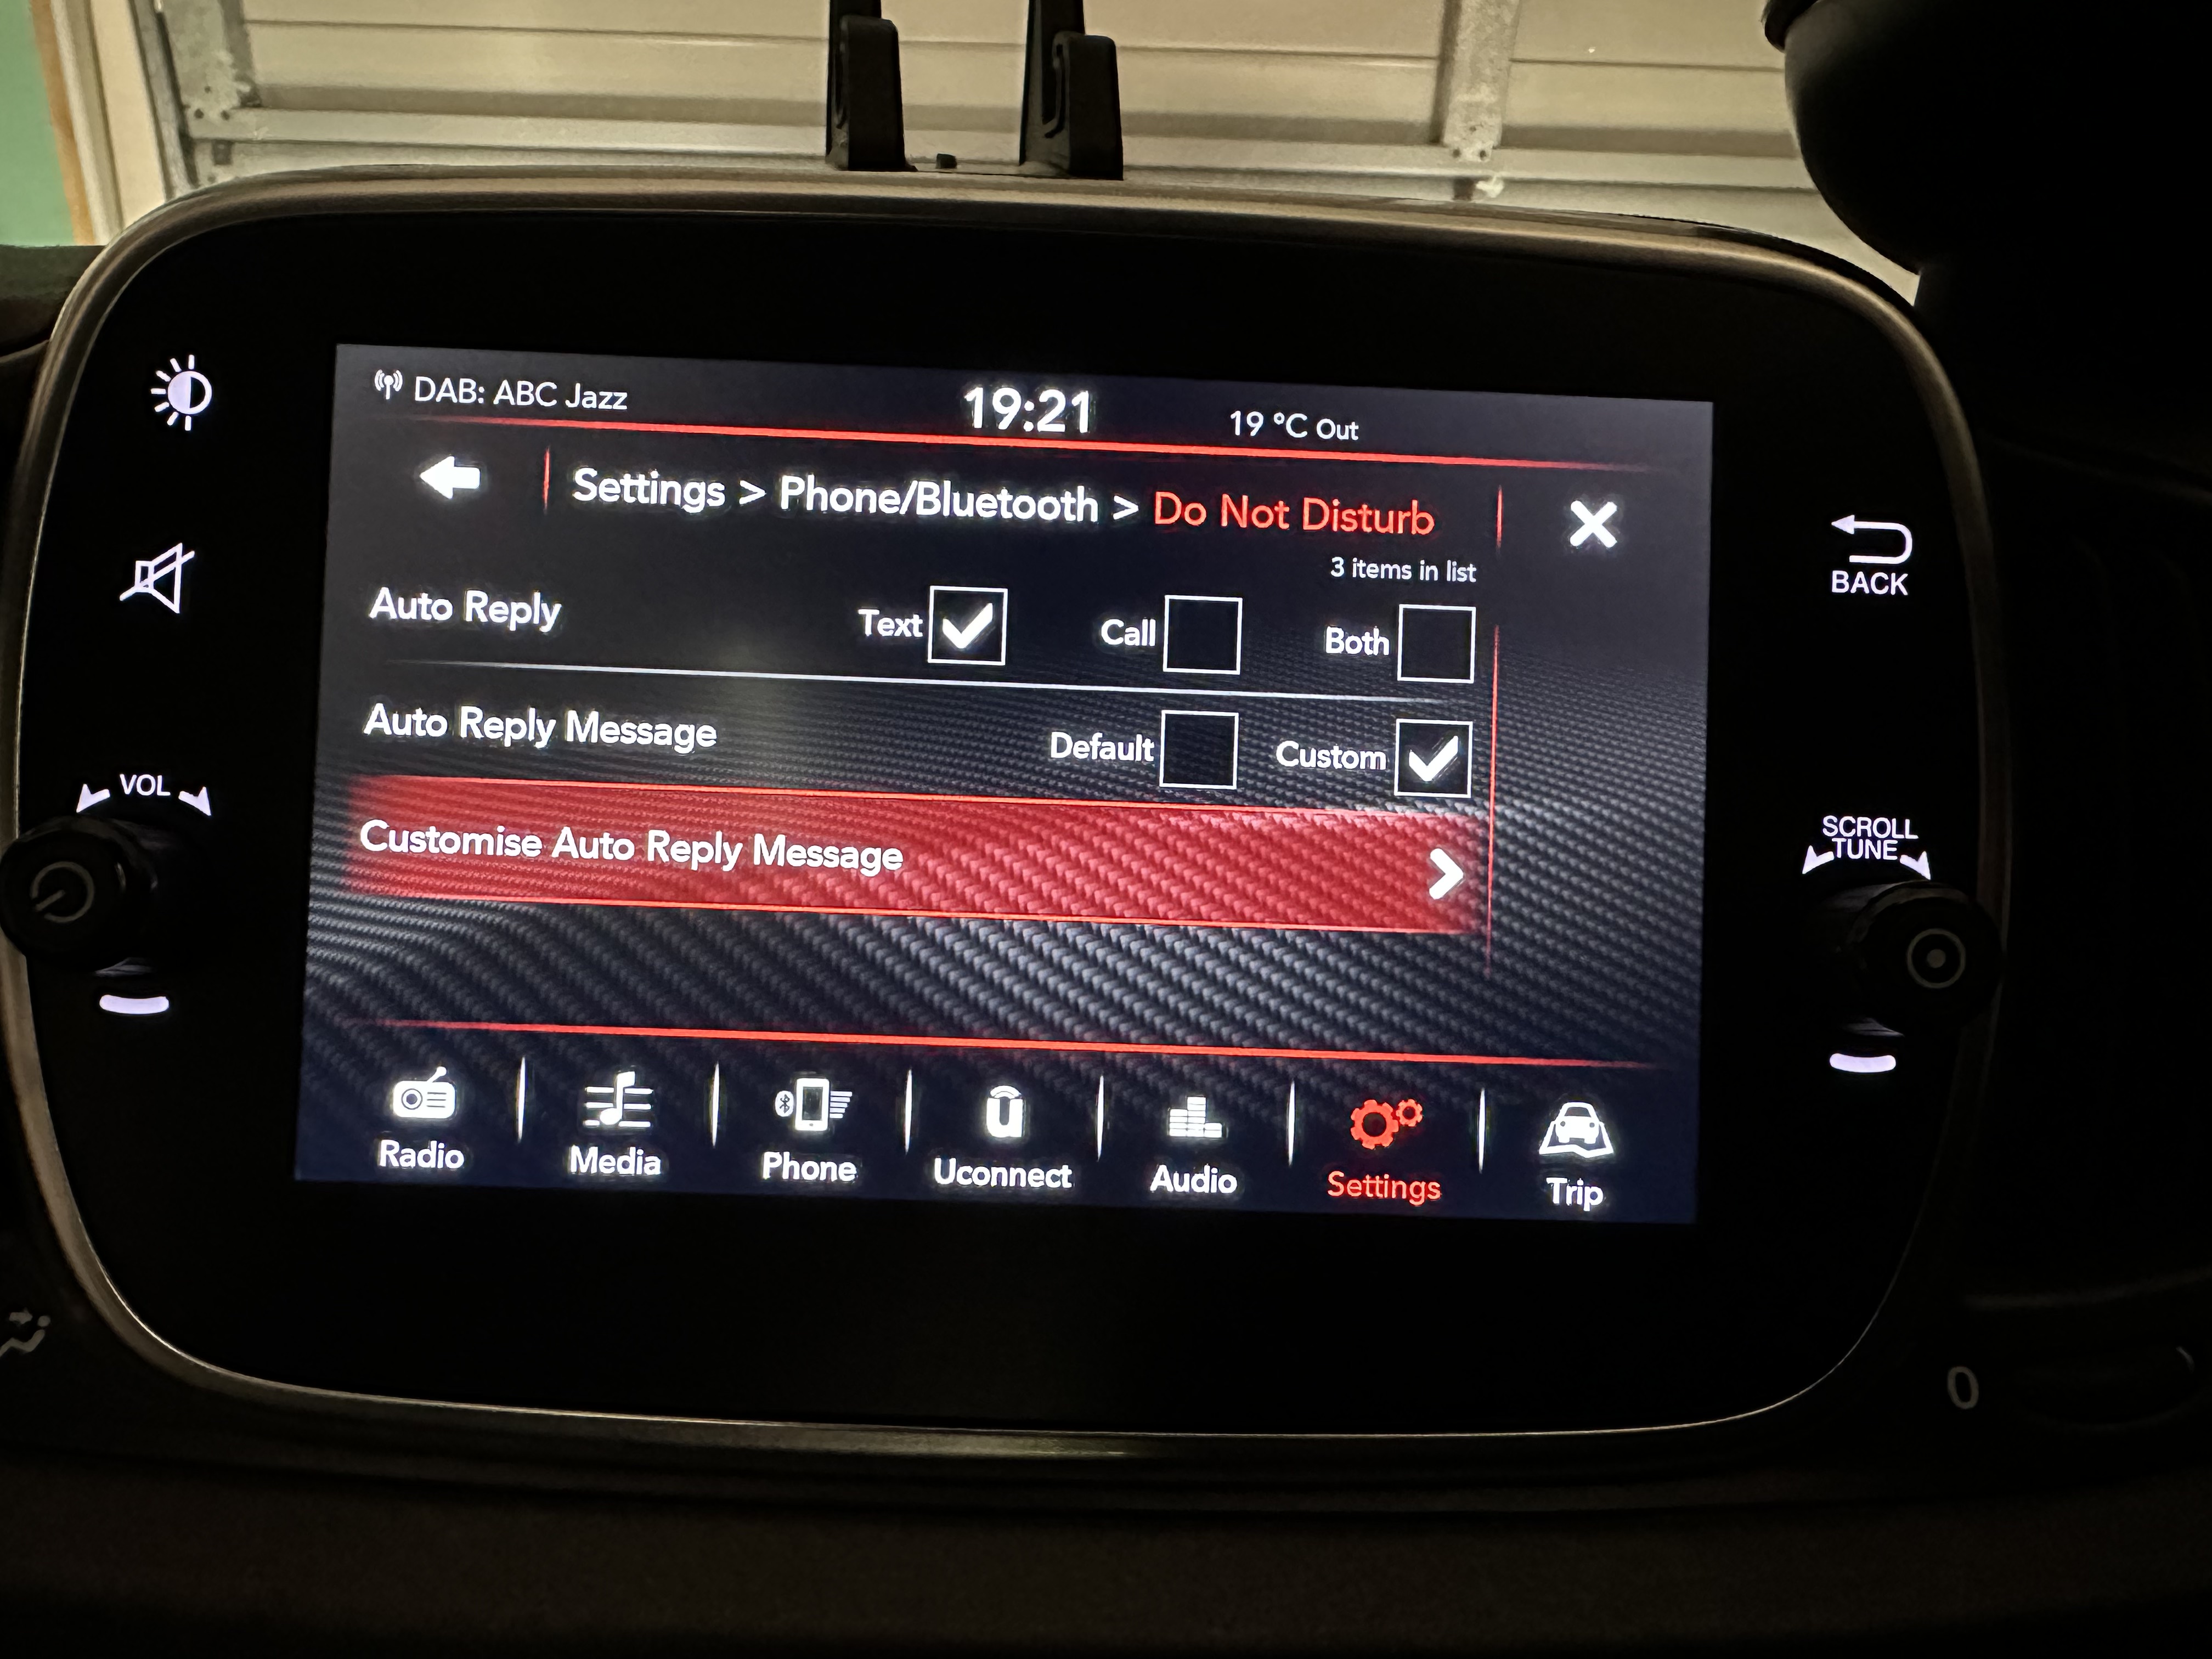
- Step 3 - Click on Customise Auto Reply Message (You may also need to have Auto Reply set to Text and Message set to Custom as shown)
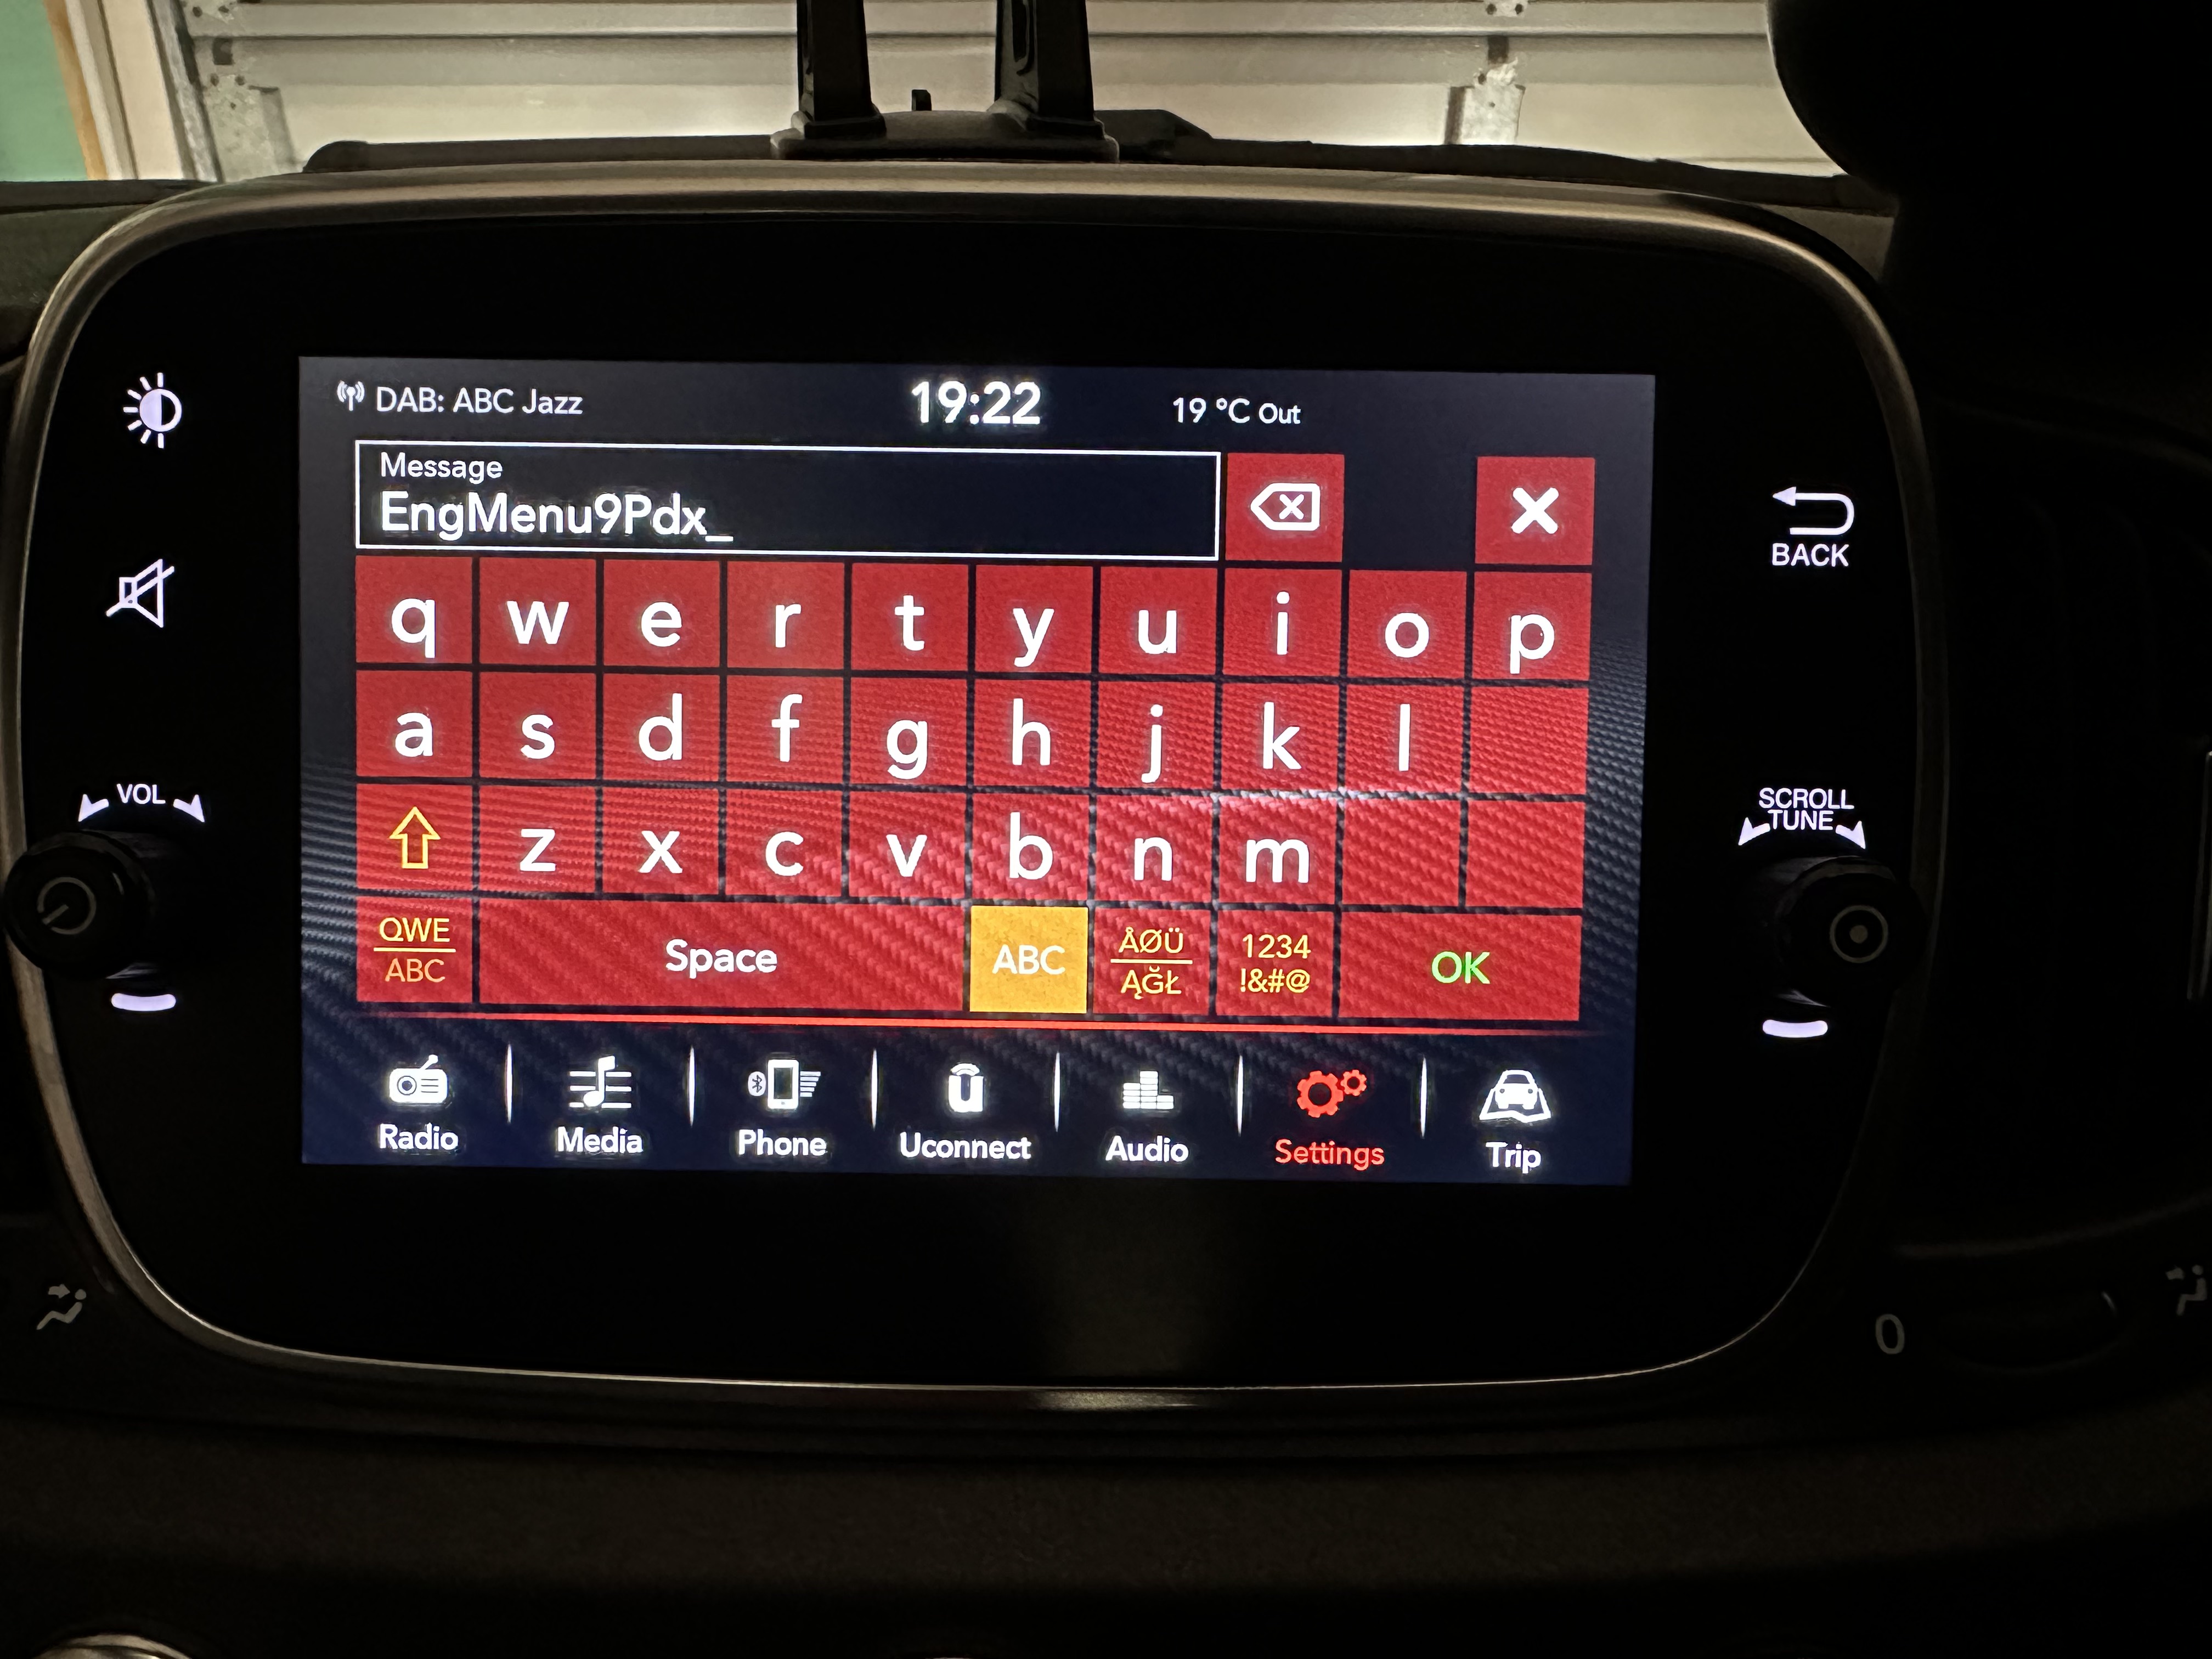
- Step 4 - When the keyboard appears, type in exactly the following text:
EngMenu9Pdxand then Click OK - Step 5 - You should be in....
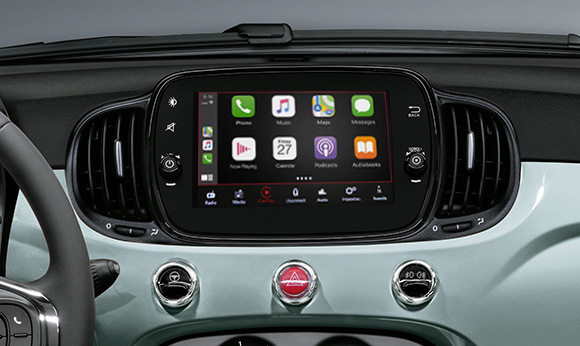
How to get Full Screen Apple CarPlay on a Uconnect 7"
The biggest complaint I have with the UConnect 7" is that in CarPlay mode there is too much of a border around the image. They've somehow created a tiny viewport and this seems completely unnecessary since CarPlay can adapt to whatever screen size the radio can support. I found this tantalising image which shows it's possible, but I have no idea how to enable it. Please send me a note if you have any ideas.
Posted: 24-July-2023, Updated 3-August-2023